All the fresh, simple ingredients needed to make perfect crispy falafel at home.
Craving that impossibly crispy shell and tender, herb-filled center you get from a street vendor? This authentic falafel recipe is your blueprint, built on a unique dry-soak method that unlocks the secret to the ideal texture and deep, savory flavor. We’re bypassing all the common pitfalls to deliver a straightforward recipe that guarantees golden-brown perfection every time you fry. It’s more than just a falafel guide; it’s your ticket to mastering a beloved global street food and bringing its vibrant, satisfying crunch right to your kitchen table.
Why This Falafel Method Rewrites the Rulebook
Forget everything you’ve heard about canned chickpeas and gummy centers. Here’s the core insight that makes this technique a revelation for homemade falafel.
Engineered for the Perfect Bite: Crispy Exterior, Fluffy Interior
➤ The Dry-Soak Secret: Hydrating dried chickpeas with sunflower seeds builds superior structure and nutty flavor.
➤ The Textured Mash Principle: Processing to a coarse, pebbly consistency—not a paste—is non-negotiable for a light interior.
➤ The Binding Science: Residual starch from unrinsed beans acts as natural glue, eliminating the need for flour.
A Streamlined Process for Guaranteed Success
▣ The Forming Rule: Gently mound the mixture; tight packing is the enemy of fluffy falafel.
▣ The Frying Sweet Spot: Maintaining 365°F oil ensures a crisp, non-greasy crust every single time.
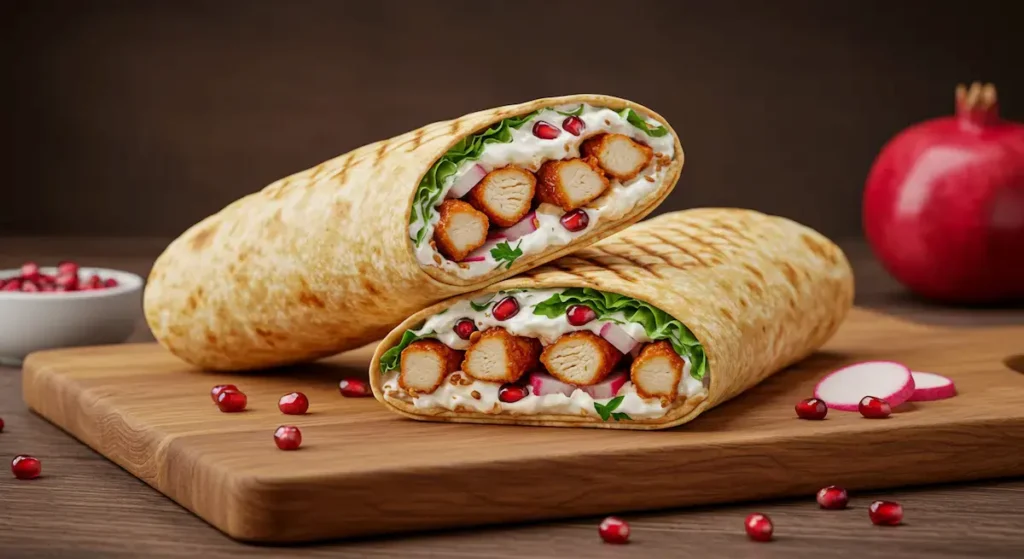
▣ The Versatile Result: A protein-packed, vegan recipe perfect for pitas, bowls, or snatching straight from the tray.
Pro Tip:For the crispiest results, let your shaped falafel mounds rest for 10 minutes before frying. This brief pause helps the exterior set up for maximum crunch.
🧑🍳 1. The Inspiration
→ Craving Solved: Born from our family’s shared love for authentic street food falafel
→ Memory Making: Created to bring the joy of bustling market flavors to our quiet kitchen
→ Mission Driven: Designed to end the frustration of homemade falafel that falls apart👨👩👧 2. The Test Kitchen
→ Family Approved: Refined through countless batches with feedback from all ages
→ Kid-Friendly Fun: Involving little hands in shaping the falafel mounds became a favorite ritual
→ Crowd-Pleasing Goal: Perfected to be the one falafel recipe that delights both guests and picky eaters⚙️ 3. The Method Evolution
→ Trial & Triumph: Tested every variable from soak time to oil temperature
→ Simplicity Focus: Streamlined the process without sacrificing authentic texture
→ Secret Unlocked: Discovered the sunflower seed trick that transformed this entire recipe🌍 4. The Cultural Connection
→ Respectful Craft: Studied traditional techniques to honor the falafel’s heritage
→ Personal Twist: Added our family’s touch while maintaining the authentic soul
→ Story Sharing: Each batch connects us to distant places and shared human traditions🍽️ 5. The Table Tradition
→ More Than Food: This falafel recipe became our Friday night celebration centerpiece
→ Bonding Experience: The sizzle of frying now signals family time and togetherness
→ Legacy Building: Passing down not just a recipe, but the stories and laughs that come with it📈 6. Your Success, Our Goal
→ Confidence Building: Structured this recipe to make you feel like a falafel expert
→ Problem Solving: Anticipated every hurdle so your first batch is a triumph
→ Joy Sharing: This recipe exists to spread the happiness we found in perfect homemade falafel
Family Wisdom: We learned that the best falafel recipe isn’t just about ingredients—it’s about the patience to soak, the joy of shaping, and the love of sharing something truly special with people you care about.
From My Family Table to Yours: Our Falafel Story
The “Reinvented” Quest for Truly Crispy, Authentic Falafel
This ultimate falafel recipe emerged from a simple family desire: to recreate the magic of our favorite street food memories at home. We’ve refined this heartfelt, kitchen-tested method to transform a potentially finicky project into a joyful, achievable ritual, guaranteed to deliver the crispy texture and vibrant flavor your whole table will adore.
Here’s the Love We Kneaded Into Every Bite:
➤ Inspired by the pursuit of that perfect crispy shell and fluffy, herb-filled center you find at the best street carts.
➤ Born from the belief that making authentic falafel should be an engaging, rewarding experience, not a stressful one.
➤ Crafted around a unique dry-soak method because we value foolproof technique and your precious time in the kitchen.
➤ Family tested and cheered by both picky eaters and food lovers to guarantee a crowd-pleasing dish everyone will devour.
➤ Designed to be the last homemade falafel recipe you’ll ever need to search for.
Pro Tip:Let the shaped falafel mounds rest for 10 minutes before frying. This brief pause helps the exterior set, resulting in an even crispier crust that holds together perfectly.
One Recipe That Adapts for Every Diet & Preference
🌿 1. Naturally Vegan & Vegetarian
→ Plant-Powered Base: This falafel recipe relies solely on chickpeas and seeds for protein
→ Dairy-Free Joy: No eggs or dairy needed—just natural binding from the soaked beans
→ Ethical Feast: A complete meal that aligns with compassionate eating choices
🚫 2. Gluten-Free Guarantee
→ No Flour Needed: The starch from unrinsed chickpeas acts as the perfect binder
→ Safe Preparation: Made in a dedicated processor to avoid cross-contamination
→ Celiac Friendly: A worry-free falafel that everyone can enjoy together
🥑 3. Keto & Low-Carb Friendly Version
→ Carb-Conscious: Use half chickpeas, half crushed hemp hearts for fewer net carbs
→ High-Fat Boost: Fry in avocado oil and serve with a rich tahini sauce
→ Satisfying Swap: Creates a hearty falafel that fits your macros perfectly
👶 4. Kid-Approved & Picky Eater Win
→ Flavor Flexibility: Reduce cumin for milder falafel that young palates prefer
→ Fun Shapes: Let kids form their own mini falafel patties or fun shapes
→ Dipping Strategy: Serve with colorful veggie sticks and mild yogurt sauce
👵 5. Senior-Friendly & Easy Digestion
→ Gentle Soaking: The 18-hour soak breaks down complex sugars for easier digestion
→ Soft Interior: The fluffy texture is perfect for those with dental concerns
→ Spice Control: Adjust garlic and onion levels for sensitive stomachs
🏃 6. Athlete & High-Protein Boost
→ Protein Power: Add 2 tbsp of pea protein powder to the mixture pre-frying
→ Recovery Fuel: Perfect post-workout meal with complex carbs and plant protein
→ Energy Sustaining: The fiber and protein in this falafel keep you fueled for hours
Inclusive Wisdom: This adaptable falafel recipe proves that delicious, authentic food doesn’t require exclusion—with simple tweaks, everyone at your table can enjoy the same crispy, golden delight, regardless of diet or preference.
The Heartbreak of Bad Falafel
Why Most Homemade Versions Fail Before You Even Start
Nothing beats a perfect falafel—crisp, golden, and fluffy inside. Yet most homemade attempts end in disappointment: dense, crumbly, or sadly soggy. This falafel recipe exists to fix that. It targets the exact mistakes that cause failure, turning your kitchen into a source of authentic street-food triumph. Let’s leave the bland, heavy patties behind and unlock the five simple secrets to falafel worthy of a bustling market stall.
The 4 Common Pitfalls This Recipe Eradicates:
➀ Relying on Canned Chickpeas: Their pre-cooked softness sabotages texture from the start.
➁ Over-Processing the Mix: Turning the blend into a smooth paste guarantees a gummy, heavy result.
➂ Packing the Mixture Tight: Compressing it into firm balls crushes all chance of a light interior.
➃ Frying with Guesswork: Inconsistent oil temperature leads to burnt shells or greasy, pale falafel.
Pro Tip:Success starts with mindset. Trust the process—each secret builds on the last for foolproof falafel.
Fix Common Problems & Guarantee Perfect Texture Every Time
🧱 1. Problem: Falafel Falls Apart in Oil
→ Likely Cause: Mixture too dry or you rinsed away the binding starch
→ Quick Fix: Add 1 tsp tahini or aquafaba (chickpea water) to the mixture
→ Prevention: Never rinse soaked beans—that starchy film is your glue
🏋️ 2. Problem: Dense, Heavy Interior
→ Likely Cause: Over-processed into paste or packed too tightly when forming
→ Quick Fix: Gently break apart and repulse briefly; form looser mounds
→ Prevention: Pulse to pebbly texture only; handle mixture with care
💧 3. Problem: Soggy, Greasy Falafel
→ Likely Cause: Oil temperature too low or crowded frying pan
→ Quick Fix: Increase heat to 375°F and fry in smaller batches
→ Prevention: Use a thermometer and maintain a steady 365°F oil🍞
4. Problem: Bland, Missing Flavor
→ Likely Cause: Insufficient seasoning or old spices
→ Quick Fix: Add extra cumin, coriander, or a pinch of cayenne to taste
→ Prevention: Always taste raw mixture and adjust salt/herbs before frying
🌡️ 5. Problem: Burnt Outside, Raw Inside
→ Likely Cause: Oil temperature too high or falafel mounds too large
→ Quick Fix: Reduce heat to 350°F and make smaller, golf-ball-sized mounds
→ Prevention: Keep oil at 365°F and form uniform, manageable portions
🍚6. Problem: Too Crumbly After Cooking
→ Likely Cause: Not enough moisture in the mixture or beans over-soaked
→ Quick Fix: For next batch, soak beans for 18 hours; add grated onion for moisture
→ Prevention: Ensure beans are fully plump after soaking before processing
Chef’s Insight: Every failed falafel has a simple solution. This troubleshooting guide transforms kitchen frustrations into learning moments, ensuring your next batch of this recipe becomes your best batch yet.
Secret #1: The Dry Chickpea Doctrine
The Non-Negotiable First Step to Authentic Falafel
Your falafel journey begins with one irreplaceable choice: dried chickpeas. Canned chickpeas are pre-cooked and too soft, creating a wet, mushy base that can never achieve the necessary structure. Dried chickpeas, once soaked, provide the perfect starch profile and firmness. This recipe depends on that unique texture to build a mixture that holds together and fries up crisp. It’s the absolute foundation; skip this, and the other secrets won’t work. This is what makes an authentic falafel recipe possible.
Why Dry Chickpeas Make All the Difference:
★ Structural Integrity: They provide a firm, coarse base that binds naturally.
★ Optimal Hydration: Soaking gives you full control over the final texture.
★ Superior Flavor Base: They offer a clean, nutty canvas for herbs and spices.
★ Authenticity Guarantee: This is the only way to achieve genuine street-food falafel texture.
Pro Tip:Look for “Garbanzo Beans” with a recent packaging date to ensure they soak well and cook evenly.
Why 365°F is the Magic Number for Crispy, Non-Greasy Falafel
🎯 1. The Golden Rule: 365°F
→ Perfect Seal: This temperature creates an instant crust that locks in moisture
→ Oil Defence: Forms a barrier so oil can’t seep into your falafel
→ Maillard Magic: Activates browning reactions for complex, savory flavor
😟 2. Too Cool: The Soggy Disaster (Below 350°F)
→ Oil Absorption: Falafel acts like a sponge, soaking up grease
→ Pale & Limp: No crisp crust forms, leaving you with soft, oily patties
→ Cooking Time: Takes forever, resulting in dense, overcooked interiors
🔥 3. Too Hot: The Burnt Failure (Above 380°F)
→ External Burn: Outside blackens before inside cooks through
→ Bitter Taste: Burnt crust ruins the delicate herb and chickpea flavor
→ Raw Center: Beautifully brown outside masks a cool, pasty interior
⚖️ 4. The Thermal Balance
→ Even Cooking: 365°F allows heat to penetrate at the perfect rate
→ Steam Creation: Interior moisture turns to steam, creating an airy texture
→ Time Window: Gives you 4-5 minutes for perfect golden-brown color
📊 5. Oil Type Matters
→ High Smoke Point: Use avocado, sunflower, or peanut oil (above 400°F)
→ Neutral Flavor: Won’t compete with the falafel’s herbaceous notes
→ Quantity: Enough to fully submerge your falafel for even cooking
🔧 6. Tools for Temperature Control
→ Thermometer Essential: Digital instant-read is your best investment
→ Batch Management: Fry 4-5 falafel at a time to maintain heat
→ Recovery Time: Let oil return to 365°F between batches for consistency
Pro Kitchen Wisdom: Mastering this single element of the recipe transforms your falafel from good to extraordinary. Think of your thermometer as the conductor, and 365°F as the perfect rhythm for a symphony of crispness.
Secret #2: The Sunflower Seed “Soak Buddy”
The Flavor and Binding Powerhouse You Never Knew You Needed
Here’s a unique twist that elevates this falafel recipe: soak your dried chickpeas with raw sunflower seeds. This isn’t just for fun. As they hydrate together for 18 hours, the seeds impart a subtle, nutty depth directly into the chickpeas. More importantly, they contribute their own proteins and structure to the final mix, acting as a natural binding agent. This secret ingredient builds a more complex flavor profile and a sturdier mixture, setting the stage for falafel that holds its shape beautifully without any flour.
What the Sunflower Seed Soak Delivers:
✦ Infused Nutty Flavor: The chickpeas absorb flavor from the inside out during the long soak.
✦ Natural Binder: The seeds add body, helping the mixture cohere without heaviness.
✦ Enhanced Nutrition: You add healthy fats, protein, and minerals to your falafel.
✦ Unique Texture Contributor: They help create the ideal coarse grind for perfect texture.
Pro Tip:Use unsalted, raw sunflower seeds for the purest flavor and best binding result.
Creative Swaps & Flavor Twists for Your Personal Masterpiece
🌿 1. Herb Variations
→ Cilantro Boost: Replace half parsley with fresh cilantro for vibrant flavor
→ Minty Fresh: Add 2 tbsp chopped mint leaves for a cooling, Middle Eastern touch
→ Dried Herb Option: Use 2 tsp dried parsley + 1 tsp dried cilantro if fresh is unavailable
🌶️ 2. Spice Adventures
→ Smoky Twist: Add 1 tsp smoked paprika to the mixture before processing
→ Warm Depth: Include ½ tsp ground coriander with the cumin
→ Heat Lover: Mix in ¼ tsp cayenne or crushed red pepper flakes for spicy falafel
🥜 3. Seed & Nut Swaps
→ Sesame Inside: Replace sunflower seeds with 3 tbsp toasted sesame seeds
→ Pine Nut Luxury: Use chopped pine nuts for a richer, buttery falafel
→ Hemp Heart Health: Swap with hemp seeds for extra omega-3s and protein
🍋 4. Zesty Add-Ins
→ Lemon Zest: Add zest of one lemon to brighten the entire falafel recipe
→ Preserved Lemon: Finely chop 1 tbsp for a complex, tangy umami punch
→ Sumac Sprinkle: Mix 1 tsp ground sumac into the dry ingredients
🌾 5. Binding Alternatives
→ Chickpea Flour: Add 1-2 tbsp if your mixture feels too wet for forming
→ Oat Flour: Use gluten-free oat flour as a neutral, fiber-rich binder
→ Potato Booster: Mix in 2 tbsp mashed potato for exceptionally moist falafel
🍛 6. Global Flavor Journeys
→ Indian Inspired: Add 1 tsp garam masala and serve with mint chutney
→ Greek Style: Include dried oregano and serve with tzatziki sauce
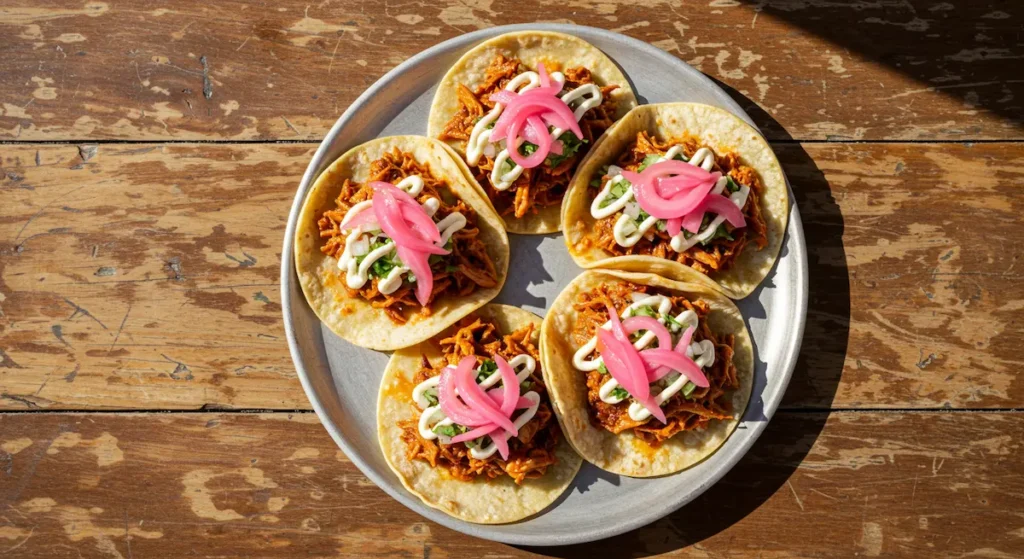
→ Mexican Fusion: Add chili powder and serve in tortillas with salsa
Creative Wisdom: This falafel recipe is your canvas. Once you’ve mastered the basic method, these twists let you paint with flavors from around the world, transforming each batch into a new culinary adventure that’s uniquely yours.
Secret #3: The “Pebbly Texture” Cue
The Visual Sign That Guarantees a Fluffy, Never Dense, Interior
After soaking and draining, you’ll process the mix. This is the make-or-break moment. Secret #3 is a clear visual target: a “pebbly texture.” You must pulse—not blend—the ingredients until the mixture is coarse and crumbly, with small, distinct pieces. It should look uneven, like coarse sand or small pebbles. If you process it into a smooth, homogenous paste, you’ve activated the wrong starches and will get dense, heavy falafel. This pebbly texture is the guardian of air pockets, which expand during frying to create that dreamy, fluffy interior. It’s the most important visual cue in this entire recipe.
How to Recognize and Achieve the Perfect Grind:
◈ The Look: The mixture should be heterogeneous, not a uniform puree.
◈ The Feel: It will be slightly damp and hold together when pressed, but feel gritty.
◈ The Sound: Listen for a change from loud chopping to a softer “sandy” sound.
◈ The Test: Pinch some—it should form a loose clump that breaks apart easily.
Pro Tip:Use the pulse function in 1-2 second bursts. Check the texture after every 3 pulses to avoid over-processing.
The Creamy, Zesty Sauce That Elevates Your Falafel to Legendary
📐 1. The Perfect Ratio Foundation
→ Tahini Base: ½ cup high-quality, runny tahini paste
→ Citrus Balance: ¼ cup fresh lemon juice (about 2 juicy lemons)
→ Garlic Punch: 2 medium cloves, finely minced or pressed
→ Water Magic: ¼-⅓ cup ice water for creamy consistency
🧂 2. Seasoning Secrets
→ Salt Sweet Spot: ½ tsp sea salt to enhance all flavors
→ Cumin Twist: ¼ tsp ground cumin for warm, earthy depth
→ Optional Spark: Pinch of sumac or smoked paprika for color and tang
🔄 3. The Whisking Technique
→ Start Thick: Whisk tahini and lemon juice—it will seize up initially
→ Water Gradually: Add ice water spoon by spoon while whisking constantly
→ Emulsion Magic: Watch it transform from thick paste to luscious, creamy sauce
🌡️ 4. Consistency Control
→ Drizzle Perfect: Aim for honey-like consistency for pouring over falafel
→ Dip Ready: Less water for a thicker sauce, perfect for pita dipping
→ Dressing Style: Thin further for a salad dressing to accompany your falafel plate
💡 5. Flavor Variations
→ Herby Green: Blend in ¼ cup fresh parsley or cilantro
→ Spicy Kick: Add 1 tbsp harissa paste or ½ tsp cayenne
→ Mediterranean: Stir in 2 tbsp chopped sun-dried tomatoes
⏳ 6. Make-Ahead & Storage
→ Flavor Development: The sauce tastes best after 1 hour in the fridge
→ Storage Life: Keeps in an airtight container for up to 2 weeks
→ Separation Fix: Just whisk vigorously if it separates—no need to worry
Sauce Mastery: This tahini sauce recipe is the loyal sidekick your crispy falafel deserves. Mastering this creamy, versatile condiment completes your Middle Eastern feast and turns a great falafel recipe into an unforgettable culinary experience.
Secret #4: The “No-Rinse” Rule
The Starch Secret That Holds Your Falafel Together
Here’s a step that feels counterintuitive but is utterly crucial. After their long soak, you drain the chickpeas and seeds—but you do not rinse them. This is Secret #4. The cloudy, starchy liquid clinging to the beans is not dirt; it’s free, natural “glue.” This residual starch is what will bind your falafel mixture together without needing any flour or eggs, keeping the final texture light. Washing it away is the quickest way to end up with crumbly falafel that falls apart in the oil. In this recipe, that starchy film is your best friend.
Why You Must Preserve the Starch:
✔ Natural Binding Agent: It acts as an effective, lightweight adhesive for the mixture.
✔ No-Filler Needed: It eliminates the need for flour, which can make falafel doughy.
✔ Crispness Promoter: It helps form a better crust during frying.
✔ Authentic Technique: This is how traditional falafel achieves its perfect hold.
Pro Tip:Simply pour the soaked beans into a colander and let the water drain. A little cloudiness is perfect.
Transform Extra Falafel into Exciting New Meals (Zero Waste!)
🥗 1. Protein-Packed “Croutons”
→ Salad Upgrade: Crumble leftover falafel over fresh greens as flavorful croutons
→ Bowl Booster: Add to grain bowls with quinoa, roasted veggies, and tahini drizzle
→ Texture Magic: Provides crispy contrast to soft salads—reheat briefly for extra crunch🍳 2. Breakfast Hash Revolution
→ Morning Power: Sauté crumbled falafel with diced potatoes, onions, and peppers
→ Egg Companion: Top your hash with fried or scrambled eggs for complete protein
→ Quick Brunch: Ready in 10 minutes—a hearty start to any day
🫑 3. Stuffed Pepper Delight
→ Halve & Fill: Stuff bell pepper halves with mashed falafel mixture
→ Saucy Bake: Top with marinara sauce and bake until peppers are tender
→ Cheesy Finish: Sprinkle with feta or mozzarella in the last 5 minutes
🍝 4. Pasta & Noodle Twist
→ Crumbled “Meatball”: Use as vegetarian “meat” in spaghetti sauce
→ Stir-Fry Star: Add to vegetable noodles or rice with soy-ginger sauce
→ Creamy Pasta: Mix into Alfredo or cheese sauce for protein-packed pasta
🌮 5. Taco & Wrap Transformation
→ Falafel Tacos: Warm and place in tortillas with slaw and avocado crema
→ Breakfast Wrap: Combine with scrambled eggs and cheese in a morning burrito
→ Greek Gyro: Serve in pita with tzatziki, tomatoes, and red onion
🍔 6. Burger & Sandwich Makeover
→ Falafel Burger: Place whole falafel patties on buns with fixings
→ Slider Party: Make mini versions for party appetizers
→ Cold Sandwich: Slice and layer in sandwiches with hummus and veggies
Smart Kitchen Wisdom: This falafel recipe keeps giving! These creative hacks ensure no golden-brown morsel goes to waste, transforming leftovers into entirely new meals that feel fresh and exciting—making your initial cooking effort work double or triple duty.
Secret #5: The Gentle Hand
How Forming Mounds, Not Balls, Guarantees Airy Perfection
The final secret is all in your touch. When shaping, you must fight the instinct to roll the mixture into a tight, compact ball. Secret #5 is forming loose, craggy mounds. Gently scoop and shape the mixture, letting it be uneven and rustic—like building a little snowdrift, not packing a snowball. This gentle handling preserves the precious air pockets created by the pebbly texture. A tight ball squeezes those air pockets out, guaranteeing a dense result. A craggy mound gives the hot oil more surface area to crisp up, creating the ultimate contrast of a shattering shell and a cloud-like, herb-filled center in your falafel.
The Art of the Perfect Form:
➤ Light Touch: Use your fingertips, not your palms, to gently gather and shape.
➤ Embrace Imperfection: Jagged edges and a loose structure are what you want.
➤ Consistent Size: Make mounds about the size of a golf ball for even cooking.
➤ The Final Test: A properly formed mound should feel fragile, not like a firm meatball.
Pro Tip:Slightly dampen your hands with water to prevent sticking. This lets you shape without compacting the falafel mixture.
Assemble the Perfect Falafel Plate That Transports You to a Bustling Market
🌟 1. The Star of the Show
→ Golden Crispy Falafel: Arrange 4-5 hot, freshly fried falafel prominently
→ Visual Appeal: Create height in the center of your plate or platter
→ Aroma First: Serve immediately so the heavenly scent welcomes everyone
🫓 2. The Warm Foundation
→ Pillowy Pita Bread: Warm whole pitas or cut into triangles for dipping
→ Lahmacun Option: Use thin Turkish flatbread as an authentic base
→ Gluten-Free: Offer lettuce cups or gluten-free wraps for everyone
🥒 3. The Crunchy Companions
→ Israeli Salad: Diced cucumbers, tomatoes, red onion with lemon-parsley dressing
→ Pickled Array: Turnips, cucumbers, and carrots for tangy brightness
→ Fresh Herbs: Generous handfuls of mint, parsley, and cilantro scattered throughout🥣 4. The Saucy Drizzles
→ Creamy Tahini: The essential sauce for dipping and drizzling
→ Spicy Zhug: Green chili sauce for heat lovers
→ Garlic Yogurt: Cooling tzatziki-style sauce to balance flavors
🧅 5. The Flavor Accents
→ Quick-Pickled Onions: Thin red onions in vinegar for 30 minutes
→ Sumac Sprinkle: The crimson spice that adds tartness and color
→ Toasted Sesame: A light sprinkle over everything for a nutty finish
🍋 6. The Final Touches
→ Lemon Wedges: Fresh citrus to squeeze over at the last moment
→ Olive Oil Drizzle: High-quality extra virgin olive oil for richness
→ Edible Flowers: Optional but stunning for special occasions
Feast Wisdom: The magic of this falafel recipe isn’t complete until it’s surrounded by its supporting cast. Building this vibrant plate turns a simple recipe into a celebratory experience, recreating the joy, color, and communal spirit of the world’s best street food markets right at your table.
Equipment 1: Rinsing the base ingredients is the first step to clean, ready-to-soak chickpeas.
Equipment 2: A sturdy food processor is key for creating the perfect coarse falafel texture.
Equipment 3: A heavy pot and thermometer ensure the oil is at the perfect temperature for crispy falafel.
The Simple Equipment That Makes Perfect Falafel Effortless
① The Heavy-Duty Food Processor: Your Texture Command Center
This is the non-negotiable workhorse for authentic falafel. A sturdy food processor gives you the power to achieve the crucial “pebbly texture” (Secret #3) through controlled pulsing. Blenders or manual chopping can’t replicate this consistency—they tend to over-process into a paste or leave chunks too large. The processor’s blade quickly and evenly breaks down the soaked chickpeas, sunflower seeds, and aromatics into the perfect coarse, crumbly mixture that promises a light, fluffy interior in your final falafel. Pro Tip:For the most even texture, pulse in short, 2-second bursts and use the “S” blade to scrape down the sides of the bowl between pulses.
② The Deep, Heavy-Bottomed Pot & Thermometer: Your Frying Foundation
A deep, heavy pot (like a Dutch oven) is ideal for frying because it retains heat steadily, preventing dangerous temperature drops when you add the falafel. Pair it with a reliable instant-read or candy thermometer. This duo is the guardian of Secret #5’s frying philosophy, allowing you to maintain the precise 365°F oil temperature needed for a crisp, non-greasy crust. Without a thermometer, you’re guessing, and guesswork often leads to soggy or burnt falafel. Pro Tip: Use an oil with a high smoke point, like avocado or sunflower oil, and never fill your pot more than halfway to ensure safety when frying.
③ The Sturdy Slotted Spoon & Baking Sheet: Your Forming & Frying Partners
A strong, slotted metal spoon is your best friend for both shaping and frying. Its slots allow excess oil to drain instantly when you retrieve your golden falafel, keeping them perfectly crisp. Before frying, use a parchment-lined baking sheet to hold your gently formed mounds (Secret #5). This gives them a stable resting place and makes transferring them to the hot oil simple and mess-free, preserving their delicate shape. Pro Tip: Keep a second baking sheet lined with paper towels next to the stove. This creates an efficient landing zone to drain your fried falafel immediately.
Step 6: Fry the falafel mounds in 365°F oil until they are deeply golden and crisp all over.
Your Clear, Foolproof Path from Soaked Beans to Golden Perfection
❶ The Long Soak: Building Flavor and Structure
Combine the dried chickpeas and sunflower seeds in a large bowl. Cover them with several inches of cold water, stir in the sea salt, and let them soak at room temperature for a full 18 hours. This hydrates the beans fully and allows the seeds to infuse their nutty flavor (Secret #2), creating the foundational texture for your falafel. Pro Tip: Set a reminder! The long, slow soak is crucial for the right texture, so plan this step a day before you want to fry.
❷ The Strategic Drain: Preserving the Natural Binder
After soaking, pour the contents of the bowl into a colander to drain off all the water. This is where Secret #4 is key: do not rinse. The starchy film left on the beans is essential for binding your falafel mixture together later in the process. Pro Tip:Let the mixture drain in the colander for 5-10 minutes to remove excess surface water without losing the precious starch.
❸ Creating the Pebbly Texture: The Pulse, Don’t Puree, Rule
Transfer the drained chickpeas and seeds to your food processor. Add the chopped onion, parsley, garlic, and cumin. Now, pulse the mixture. Your goal is Secret #3: a coarse, pebbly texture with small, distinct pieces—not a smooth hummus-like paste. Pro Tip:Use 5-7 short pulses, then check. The mixture should hold together when pinched but still look crumbly and uneven.
❹ The Final Boost: Activating with Baking Soda
Once you have the perfect pebbly texture, sprinkle the baking soda evenly over the mixture in the processor bowl. Pulse just 2-3 more times, only until the soda is incorporated. This last-minute addition gives the falafel mixture its essential lift and airiness just before frying. Pro Tip:Do not run the processor continuously after adding baking soda. Over-mixing at this stage can deflate the mixture.
❺ The Gentle Form: Shaping Loose, Craggy Mounds
With damp hands, gently scoop portions of the mixture. Following Secret #5, shape them into loose, rustic mounds about the size of a golf ball. Do not roll or compact them into smooth, tight balls. Their craggy, uneven shape is what creates maximum crisp surface area. Pro Tip: Place each formed mound on a parchment-lined tray. This keeps their shape and makes transferring them to the hot oil effortless.
❻ The Precision Fry: Sealing in Crispness
Heat your oil in a heavy pot to a steady 365°F. Using a slotted spoon, gently lower the mounds into the hot oil. Fry in batches for about 4-5 minutes, turning once, until they are deeply and evenly golden brown. This precise temperature (from the Frying Philosophy) seals a crisp crust instantly. Pro Tip:Fry only 4-5 mounds at a time. Overcrowding the pot lowers the oil temperature and leads to oily, soggy falafel.
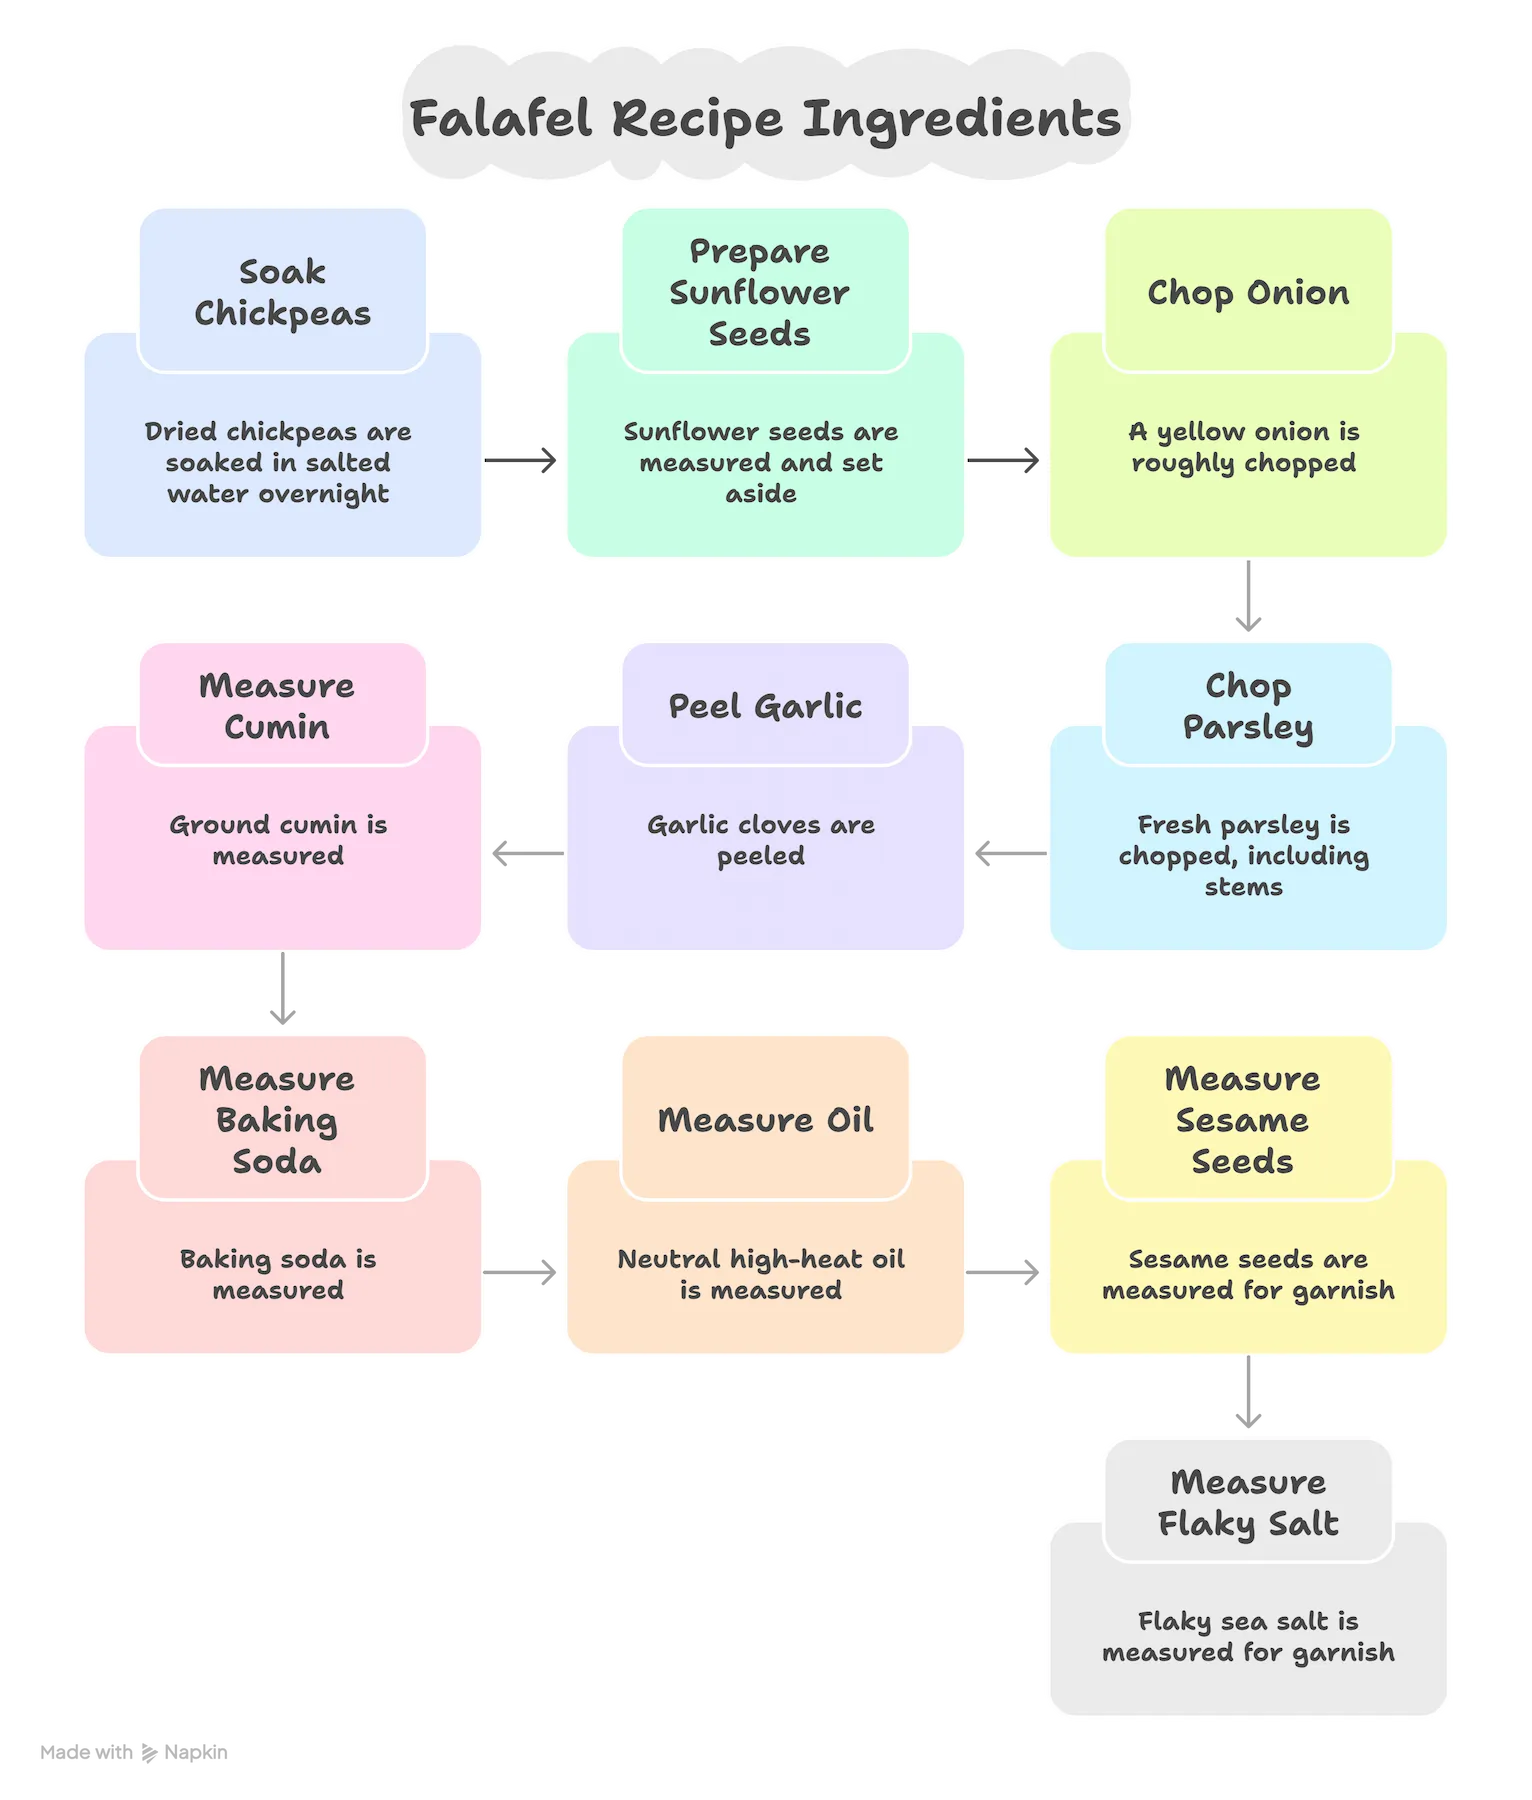
➊ Eliminates Measurement Guesswork: See exact quantities of chickpeas, sunflower seeds, and spices visually, preventing errors before you begin.
➋ Clarifies Ingredient Quality: Highlights key details like “dried, not canned” chickpeas and “raw, unsalted” seeds, ensuring you start with the right foundation for authentic falafel.
➌ Streamlines Your Workflow: Having a visual checklist speeds up prep and reduces the chance of forgetting a crucial element, making your cooking session smoother and more enjoyable.
Share your creation in the comments or on social media with pinterest
Why This Recipe Card is Essential:
❶ All-In-One Convenience: Contains precise quantities, cook times, and nutritional info in one spot, eliminating page-scrolling while you cook this falafel.
❷ Designed for Your Success: The steps are formatted for clarity, directly applying the secrets you’ve learned to guarantee crispy, authentic results every time.
❸ Your Personal Kitchen Tool: Use the “Print” and “Save” functions to keep this beloved falafel recipe in your permanent collection for easy future access.
If this recipe brings the crispy, golden perfection you craved to your kitchen, please take a second to rate it with stars in the card below—it helps us tremendously!
✦ Reinforces the Critical Sequence: Visually maps the journey from soaked beans to fried falafel, solidifying the order of operations in your mind.
✦ Highlights Key Techniques: Illustrates essential actions like “pulsing to a pebbly texture” and “forming loose mounds,” turning written secrets into clear visual cues.
✦ Boosts Confidence & Speed: Having a concise, pictorial summary by your side reduces double-checking the article, builds your confidence, and lets you cook with greater flow and assurance.
Your Journey to Falafel Mastery
Celebrate the Crispy, Golden Reward of Your Effort
And there you have it—the complete map to transforming humble chickpeas into extraordinary, crispy falafel. This recipe was built to demystify the process, replacing guesswork with reliable technique and secrets that deliver. You’re not just walking away with a dish; you’re equipped with the knowledge to recreate authentic street-food magic anytime the craving strikes. We hope this guide has made the path to perfect falafel clear, rewarding, and deeply satisfying.
What You’ve Achieved by Following This Guide:
➤ Mastered a Foundational Technique: You’ve learned the non-negotiable principles—from the dry bean start to the gentle form—that define a great falafel recipe.
➤ Gained Culinary Confidence: You now understand the why behind each step, empowering you to adapt and innovate with confidence in your own kitchen.
➤ Unlocked a World of Flavor: You possess the key to making a versatile, protein-packed centerpiece for meals, from pita sandwiches to vibrant grain bowls.
The Lasting Impact on Your Kitchen Repertoire:
✦ A Reliable Crowd-Pleaser: You have a guaranteed hit for gatherings, a vegan showstopper that delights everyone.
✦ Enhanced Meal Prep Skills: The make-ahead and storage knowledge turns this falafel into a practical tool for easy, flavorful weeks.
✦ The Joy of Homemade Authenticity: You’ve connected to a global culinary tradition, achieving that crave-worthy texture and taste far beyond any store-bought version.
Pro Tip: Share the joy! Making a double batch to freeze means you’re never more than 20 minutes away from homemade falafel. It’s the gift that keeps on giving.
Explore Regional Variations That Celebrate This Dish’s Universal Love
🇪🇬 1. Egyptian Ta’ameya (The Original)
→ Bean Base: Uses dried fava beans instead of chickpeas
→ Herb Focus: Heavy on parsley, cilantro, and dill
→ Shape: Flattened disc rather than a round ball
→ Serving: Often stuffed in baladi bread with salad and tahini
🇸🇾 2. Levantine Style (Syria, Lebanon, Jordan)
→ Chickpea Standard: The classic falafel recipe most known worldwide
→ Spice Blend: Cumin and coriander with plenty of fresh herbs
→ Texture: Crisp exterior with light, fluffy interior
→ Accompaniment: Typically served with pickles and turnips
🇮🇱 3. Israeli Innovation
→ Herb-Heavy: Extra parsley, cilantro, and sometimes mint
→ Modern Twists: Often includes baking powder for extra lift
→ Sauce Variety: Accompanied by myriad sauces from amba to harissa
→ Breakfast Fusion: Served with Israeli salad and eggs for the morning meal
🇹🇷 4. Turkish Variation
→ Spice Profile: May include pul biber (red pepper flakes) and mint
→ Shape: Sometimes larger and flatter than traditional versions
→ Serving Style: Often in dürüm wraps with cacık (yogurt sauce)
→ Garnish: Frequently includes sumac, onion, and grilled vegetables
🇵🇸 5. Palestinian Tradition
→ Family Recipes: Passed down through generations with secret blends
→ Herb Emphasis: Particularly heavy on parsley as key ingredient
→ Street Food Staple: Often sold wrapped in paper with pickled veggies
→ Cultural Symbol: Considered a national dish with deep heritage
🌍 6. Global Fusion Adaptations
→ Indian Influence: Falafel with curry spices and mint chutney
→ Mexican Twist: Served in tortillas with salsa and avocado
→ American Style: Baked falafel with innovative dipping sauces
→ European Take: Often lighter on spices, served with yogurt sauces
Cultural Wisdom: Every region adds its own signature to the beloved falafel recipe, yet the core appeal remains universal—a delicious, affordable, protein-packed street food that brings people together across cultures and continents. Our version honors this global tradition while adding our family’s tested techniques for perfect results every time.


")
")

")

")
")