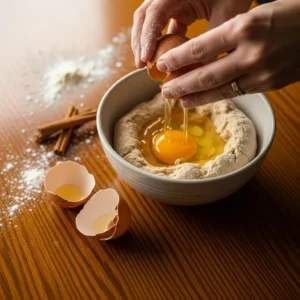
Simple pantry ingredients needed to make this easy churros recipe.
No Special Skills Needed, Just Unbelievably Delicious & Fun Results.
Forget the long lines and cravings for a classic fairground treat! This easy churros recipe is your ticket to creating magically crispy, fluffy delights right in your kitchen. It uses a unique dough technique that guarantees perfect texture and that iconic cinnamon-sugar taste. It’s the foolproof way to master a beloved street food and bring sweet, warm joy to any day, transforming basic ingredients into a fun, memorable dessert the whole family will love.
Why This Recipe is a Game-Changer for Making Churros at Home
Before you heat the oil… here’s what makes this approach a breakthrough for anyone dreaming of perfect churros with stunning simplicity.
Consistently Perfect Texture, Achieved with Ease
➤ The Pâte à Choux Base: A cooked dough creates a light, airy interior.
➤ The Piping Bag Power: A star tip gives you those classic, crispy ridges.
➤ Pantry Staple Simplicity: Whip up magic with just a handful of common ingredients.
A Surprisingly Simple and Rewarding Process
▣ The 3-Step Promise: From cooking the dough to frying in three clear stages.
▣ The Foolproof Visual Cues: Fry to a deep golden brown for the perfect crunch.
▣ The Ultimate Crowd-Pleasing Treat: A warm, sugary dessert that delights everyone.
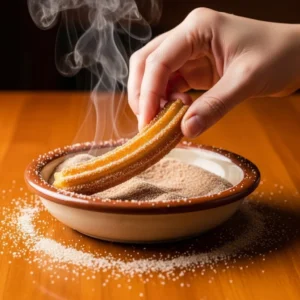
Pro Tip:For the crispiest results, always pipe your street food directly into the hot oil and avoid crowding the pot to maintain the perfect temperature.
💔 1. My First Churro Disaster
→ Soggy Results: My first batch of homemade churros came out oily and soft
→ Temperature Trouble: I learned oil temperature makes or breaks perfect churros
→ Family Feedback: Even my dog wouldn’t eat those first greasy attempts
🔍 2. The Experimentation Phase
→ Kitchen Testing: I made over 50 batches, testing different dough techniques
→ Oil Precision: Discovered 375°F is the magic number for crispy churros
→ Ingredient Ratios: Perfected the flour-to-liquid ratio for ideal texture
💡 3. The “Aha!” Moment
→ Dough Revelation: Learned the cooked dough method creates airy interiors
→ Timing Perfection: Found the exact moment to coat with cinnamon-sugar
→ Visual Cues: Mastered reading the oil’s shimmer for perfect frying
🏆 4. The Winning Formula
→ Simple Steps: Developed this 3-stage process that anyone can follow
→ Consistent Results: This method delivers perfect churros every single time
→ Family Approved: Now my kids beg for these homemade churros weekly
🌟 5. Why This Recipe Works
→ Tested & Perfected: Every step refined through extensive kitchen testing
→ Beginner Friendly: No special skills needed for professional results
→ Crowd Pleaser: These churros impress at every party and gathering
❤️ 6. Sharing the Success
→ Your Turn Now: I’m excited to share this foolproof churros recipe with you
→ Confidence Builder: This method will make you a churro master quickly
→ Joy Multiplied: Nothing beats seeing others succeed with my recipes
Pro Tip: My kitchen failures became your success recipe – every mistake I made helped perfect this method, so you get perfect homemade churros on your first try!
From My Street Food Passion to Your Kitchen: A Family-Approved Favorite
The “Reinvented” Mission for Truly Authentic Homemade Churros
This flawless street food recipe was born from a passion for bringing the magic of street food festivals into your home. We’ve perfected this simple, family-tested method to turn a beloved fried dessert into an easy and joyful kitchen project, guaranteed to deliver the most crispy-on-the-outside, fluffy-on-the-inside texture your entire family will adore.
Here’s the Heart We Poured Into Every Bite:
➤ Inspired by the quest for that perfectly golden, sugary, and impossibly light street food experience every single time.
➤ Born from the belief that creating a fun treat should be an exciting adventure, not a chore.
➤ Crafted around a unique cooked dough method because we value a reliable technique and your confident results.
➤ Kids tested and parents approved countless times to guarantee a snack that brings smiles to all ages.
➤ Designed to be the only homemade street food recipe you’ll ever need to bookmark.
Pro Tip: Roll your churros in the cinnamon-sugar mixture when they come out of the fryer for the ideal sugar coating. The residual heat helps the coating stick perfectly, ensuring maximum flavor in every bite.
🥑 2. Vegan Version
→ Egg Replacement: Use flax eggs (1 tbsp ground flax + 3 tbsp water per egg)
→ Butter Alternative: Substitute with vegan butter or coconut oil
→ Outcome: Delicious vegan churros with the same golden crispiness
🍯 3. Lower Sugar Option
→ Coating Switch: Use coconut sugar instead of white sugar
→ Dough Adjustment: Reduce the dough sugar by half for less sweetness
→ Benefit: Lower glycemic impact while maintaining great flavor
🌰 4. Nut-Free Consideration
→ Oil Safety: Use sunflower or avocado oil instead of nut oils
→ Coating Check: Ensure cinnamon is from a nut-free facility
→ Peace of Mind: Safe for schools and nut-allergy gatherings
🥛 5. Dairy-Free Alternative
→ Butter Substitute: Use coconut oil or vegan butter sticks
→ Dipping Sauce: Make chocolate sauce with coconut milk
→ Result: Creamy dairy-free churros perfect for lactose intolerance
🌟 6. All-Purpose Flour Blend
→ Standard Method: Regular all-purpose flour works perfectly
→ Measurement: Use the exact 1 cup measurement as the original recipe
→ Guarantee: Tried-and-tested method for classic homemade churros
Pro Tip: Always test your substitutions with a single street food first – this small step ensures your diet-friendly homemade churros turn out perfectly crispy every time!
The “Ah-Ha!” Moment: Why This Recipe is Different
The One Simple Step Everyone Gets Wrong (We Fixed It!)
Most homemade street food turns out soggy or dense because it skips the crucial step of dough cooking. Our method perfects this to ensure a delightfully crisp exterior that stays crispy long after frying, giving you that authentic street food texture in a foolproof recipe.
Here’s the Care We Poured Into the Technique:
✦ We perfected the cooked dough method to guarantee a light, airy interior every single time.
✦ Born from testing countless batches to solve the common problem of oily, soft street food.
✦ Crafted to value your time and success, ensuring your first batch is a golden triumph.
✦ Family tested to deliver that satisfying crunch that makes this treat irresistible to all ages.
✦ Designed to be the last street food recipe you’ll ever need, making you a home dessert hero.
Pro Tip:Use a wooden spoon to stir the dough over the heat; it’s strong enough to handle the thick mixture and tells you exactly when it’s perfectly cooked.
🥣 1. Dough Too Thin & Runny
→ Immediate Fix: Add 1 tablespoon of flour and mix thoroughly
→ Prevention: Measure flour correctly using the spoon-and-level method
→ Result: Perfect pipeable consistency for beautiful homemade churros
🛢️ 2. Churros Too Soft & Oily
→ Temperature Check: Your oil was likely below 375°F
→ Solution: Increase the heat and test with a small dough piece first
→ Outcome: Crispy exterior that makes perfect homemade churros
🎨 3. Shape Too Messy & Irregular
→ Oil Issue: Your oil was probably too hot (above 385°F)
→ Quick Fix: Reduce the heat and let the oil cool slightly before piping
→ Improvement: Clean, defined ridges on your homemade churros
🌫️ 4. Cinnamon-Sugar Won’t Stick
→ Timing Error: You waited too long after removing from the oil
→ Solution: Coat within 30 seconds while churros are still oily
→ Success: Even, generous coating that enhances every bite
💨 5. Not Puffing Up Properly
→ Dough Issue: Didn’t cook the flour mixture long enough initially
→ Next Time: Cook until dough forms a smooth ball, pulling from sides
→ Perfect Result: Light, airy centers in your homemade churros
🔥 6. Burning Outside, Raw Inside
→ Oil Problem: The Temperature is way too high for proper cooking
→ Adjustment: Maintain steady 375°F and don’t overcrowd pot
→ Final Product: Golden brown outside, fully cooked, fluffy inside
Pro Tip: Keep a digital thermometer handy – this $10 tool solves 90% of churro problems by ensuring perfect oil temperature for flawless homemade churros every time!
The “Why It Works” Deep Dive
The Science of Crispy & Fluffy: How Our Dough Creates Magic
The magic behind perfect street food lies in a simple scientific principle: steaming from the inside out. By cooking the flour with water and butter, we create a dough that puffs dramatically in hot oil, resulting in that signature crispy shell and fluffy core that defines a world-class fried dessert.
Here’s the Heart We Poured Into the Method:
✦ We harness the power of steam to create an ethereal, hollow interior in every street food.
✦ Inspired by classic pastry techniques, simplified for a relaxed and confident home cook.
✦ Crafted because understanding the “why” empowers you to cook joyfully.
✦ Kid approved for the incredibly fun “puff” you see when they hit the oil.
✦ Designed to demystify the process, turning a complex concept into an easy snack.
Pro Tip:Let the dough cool slightly before adding the eggs to avoid scrambling them, ensuring a smooth, pipeable consistency.
💧 1. Water vs. Milk Mystery
→ Crisp Factor: Water creates maximum crispiness in homemade churros
→ Science Reason: No milk solids to soften the exterior during frying
→ Texture Result: Ultra-crispy shell that stays crunchy longer
🥚 2. Room-Temperature Eggs
→ Smooth Integration: Warm eggs blend seamlessly into the dough
→ Texture Magic: Prevents curdling for velvety smooth churro batter
→ Rising Power: Helps create that perfect airy interior structure
🍬 3. Sugar’s Dual Role
→ Browning Agent: Granulated sugar promotes a beautiful golden color
→ Texture Aid: Contributes to the delicate crunch in homemade churros
→ Flavor Base: Provides the perfect sweetness level before coating
🌾 4. All-Purpose Flour Power
→ Structure Builder: Forms the sturdy framework for piping and frying
→ Protein Balance: Just enough gluten for structure without toughness
→ Reliability: Consistent results, batch after batch of homemade churros
🧈 5. Butter’s Rich Secret
→ Flavor Depth: Adds rich, savory notes that balance the sweetness
→ Tenderizing: Coats flour proteins for more tender homemade churros
→ Aroma Magic: Creates that irresistible buttery fried dough scent
🌡️ 6. Oil Temperature Science
→ Instant Seal: 375°F immediately seals the exterior to prevent oil absorption
→ Steam Creation: Hot oil turns dough moisture into rising steam
→ Perfect Cook: Achieves golden brown color while cooking through
Pro Tip: Use filtered water for your homemade street food – minerals in tap water can affect gluten development and change the final texture of your perfect churros!
The Visual Frying Guide
Reading the Oil: How to Know When It’s Exactly The Right Time to Fry
Frying street food is less about a timer and more about listening to the oil. The perfect temperature creates a lively, bubbling bath that gently but steadily turns the dough a deep golden brown, signalling a crisp finish without a greasy aftertaste, for the ultimate street food experience at home.
Here’s the Care We Poured Into Frying:
✦ We focused on visual cues so you can cook without stress, trusting your eyes over a timer.
✦ Born to achieve a consistent, beautiful golden color on every street food.
✦ Crafted to value your confidence, ensuring you master the fry with your first batch.
✦ Family tested to be a fun, observable science experiment that delights all ages.
✦ Designed to make you the master of your pot, creating the perfect dessert every time.
Pro Tip:Drop a tiny piece of dough into the oil; if it sizzles and rises to the surface surrounded by bubbles, it’s ready for frying.
🔥 1. Air Fryer Revival Method
→ Perfect Setting: 375°F for 3-4 minutes until crispy and hot
→ No Preheating: Place churros directly in the air fryer basket
→ Result: Nearly identical to fresh homemade churros with perfect crunch
🍳 2. Oven Refresh Technique
→ Temperature: 400°F on a baking rack for 5-7 minutes
→ Rack Essential: Elevates churros for air circulation all around
→ Outcome: Restores that delightful crispiness to homemade churros
❄️ 3. Freezing for Later
→ Before Coating: Freeze plain fried churros on a parchment-lined sheet
→ Storage: Transfer to an airtight container for up to 3 months
→ Ready When: You crave amazing homemade churros anytime
🎯 4. Reheating from Frozen
→ No Thawing: Cook frozen churros in an air fryer at 375°F for 5-6 minutes
→ Oven Option: Bake at 400°F for 8-10 minutes until hot and crispy
→ Finish: Coat with fresh cinnamon-sugar while still warm
🌟 5. Fresh Coating Strategy
→ Timing: Always add cinnamon-sugar after reheating, not before
→ Reason: Fresh coating sticks better and tastes more vibrant
→ Perfection: Your revived homemade churros taste bakery-fresh
💡 6. Creative Leftover Ideas
→ Churro Crumbles: Break over ice cream or yogurt for crunch
→ Bread Pudding: Use in place of bread for a decadent dessert
→ Milkshake Boost: Blend pieces into vanilla or chocolate shakes
Pro Tip: Revive your homemade street food in small batches – reheating what you’ll eat immediately ensures every piece has that just-fried crispiness we all love in perfect churros!
The Fun Factor: Getting the Kids Involved
Your New Favorite Family Activity: A Churro Making Party!
Transforming this street food into a family affair creates lasting memories beyond the kitchen. Assign safe, joyful tasks like sprinkling the cinnamon sugar or arranging the finished treat on a platter, turning the cooking process into a cherished tradition of teamwork and delicious reward.
Here’s the Heart We Poured Into the Experience:
✦ We designed the steps to include little helpers, making baking a bonding activity.
✦ Born from the belief that the best family memories are often made in the kitchen.
✦ Crafted because we value the laughter and pride of creating together.
✦ Kid tested to ensure every task is safe, simple, and immensely satisfying.
✦ Designed to be a fun, interactive project that results in a celebratory dessert.
Pro Tip:Give kids a small, shallow tray of cinnamon-sugar for coating—it’s easier for little hands and minimizes spills.
🌙 1. Overnight Dough Prep
→ Make Ahead: Prepare churro dough thoroughly 24 hours in advance
→ Storage Method: Place in an airtight container in the refrigerator
→ Result: Flavors meld for even better homemade churros the next day
❄️ 2. Proper Chilling Technique
→ Container Choice: Use an airtight container with plastic wrap on the surface
→ Temperature: Keep refrigerated at a consistent 38-40°F
→ Ready When: You want fresh homemade churros without the work
🕒 3. Day-Of Party Timeline
→ 2 Hours Before: Remove dough from fridge to reach room temperature
→ 30 Minutes Before: Re-mix dough to restore smooth, pipeable texture
→ Party Time: Fry and serve perfect homemade churros to amazed guests
🎯 4. Piping Bag Readiness
→ Prep Ahead: Fit piping bag with star tip and place in tall glass
→ Chilling Option: Store a filled piping bag in the fridge overnight
→ Efficiency: Everything is ready for quick frying when guests arrive
🌟 5. Coating Station Setup
→ Make Ahead: Mix cinnamon-sugar up to 3 days in advance
→ Storage: Keep in an airtight container at room temperature
→ Service: Set up coating station in wide, shallow bowls
💫 6. Last-Minute Freshness
→ Fry to Order: Cook churros in small batches throughout your event
→ Hot & Fresh: Serve immediately with various dipping sauces
→ Impression: Guests think you’re frying fresh homemade churros constantly
Pro Tip: Make your churro dough 24 hours ahead – the resting time improves the texture and makes your homemade street food even lighter and more flavorful for your party!
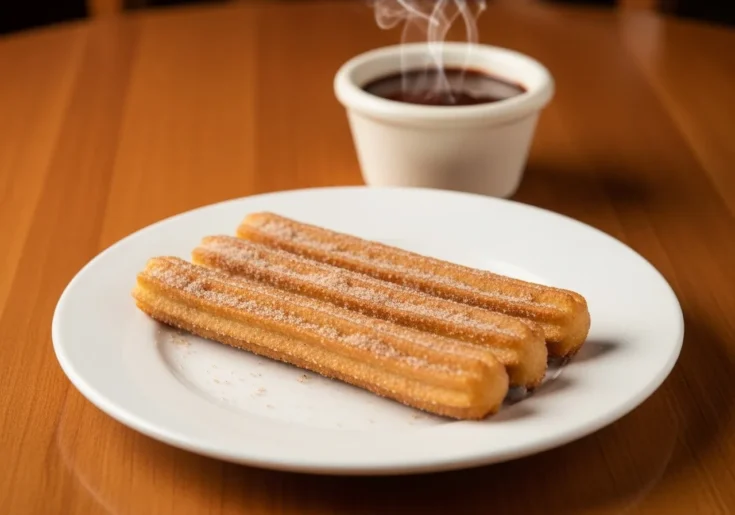
The Grand Finale: Serving & Presentation Ideas
Serve it Like a Pro: How to Create a Stunning Churro Platter
The final act of serving your homemade street food is where you can truly shine. A beautiful presentation, with dusted icing sugar, drizzled chocolate, and various dipping sauces, transforms this humble street food into a stunning centerpiece that wows guests and makes any moment feel special.
Here’s the Care We Poured Into the Presentation:
✦ We encourage creative plating to turn your delicious street food into a visual masterpiece.
✦ Inspired by the vibrant energy of street food stalls, recreated on your dining table.
✦ Crafted because we believe we eat with our eyes first, making the experience unforgettable.
✦ Family tested for the “wow” factor that brings everyone together in anticipation.
✦ Designed to be the perfect, shareable finale for your gatherings, a true dessert hero.
Pro Tip:For a professional touch, stack churros in a tall glass and dust with powdered sugar just before serving.
Beyond Chocolate: 3 Sauces That Elevate Your Churros
🍫 1. Classic Dark Chocolate Ganache
→ Simple Recipe: Melt dark chocolate with heavy cream and vanilla
→ Pro Ratio: Use 1:1 chocolate to cream for perfect dipping consistency
→ Perfect Pairing: The traditional partner for homemade churros
🥛 2. Easy Dulce de Leche
→ Quick Method: Simmer sweetened condensed milk for 2 hours
→ Shortcut: Use store-bought dulce de leche warmed slightly
→ Caramel Magic: Creamy caramel sauce elevates homemade churros
🍓 3. Fresh Raspberry Coulis
→ Simple Prep: Blend fresh raspberries with sugar and lemon juice
→ Strain Option: Sieve for smooth sauce or keep seeds for texture
→ Tangy Balance: Cuts the sweetness of your homemade churros
🌰 4. Salted Caramel Sauce
→ Easy Method: Melt sugar, add butter and cream, finish with sea salt
→ Flavor Boost: The salt enhances the sweetness of churros perfectly
→ Crowd Pleaser: Always disappears first at parties with churros
🍋 5. Zesty Lemon Curd
→ Bright Option: Tangy lemon cuts through the rich fried dough
→ Make Ahead: Prepare up to 5 days in advance and refrigerate
→ Surprise Hit: Unexpected pairing that delights churro lovers
🎨 6. Dipping Station Setup
→ Presentation: Use small ramekins or shot glasses for each sauce
→ Variety: Offer 2-3 sauces to let guests create their own combinations
→ Experience: Transform simple churros into a gourmet dessert experience
Pro Tip: Create a DIY dipping station with multiple sauces – this simple touch turns your homemade churros into an interactive dessert experience that wows guests and makes any gathering special!
Your 3 Kitchen Champions: The Simple Tools for Churro Success
Forget fancy gadgets; these three trusty tools are all you need to create flawless homemade churros easily and confidently.
Equipment 1: A sturdy saucepan is used to heat the water, butter, and sugar.
Equipment 2: A piping bag with a star tip is used to shape the classic ridged churros.
Equipment 3: A kitchen thermometer ensures the oil is at the perfect temperature for frying.
Having the right equipment transforms this churros recipe from a potential challenge into a smooth, enjoyable kitchen adventure. Let’s learn your three essential partners for creating this perfect fried dessert.
1. The Sturdy Saucepan: Your Dough’s First Home
This is where the magic begins. A heavy-bottomed saucepan distributes heat evenly, preventing the dough from scorching as you cook the flour and liquid into a perfect, smooth ball. Pro Tip:A light film of butter on the pan’s bottom before adding the water and butter makes cleanup a breeze after the dough is made.
2. The Reliable Piping Bag: Your Shape-Making Hero
This is your tool for creating those iconic, ridged churros. A sturdy piping bag fitted with a large star tip (like a 1M tip) gives you the control to pipe beautiful, consistent strips directly into the hot oil. Pro Tip:Stand the piping bag tip-down in a tall glass while you fill it with dough to keep things neat and stable and prevent any mess.
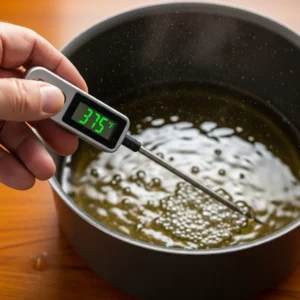
3. The Digital Thermometer: Your Frying Guardian Angel
This is the secret weapon for the crispiest, non-greasy churros. It takes the guesswork out of frying by ensuring your oil is at the perfect temperature (375°F / 190°C) for a golden-brown exterior and a fully cooked, fluffy interior. Pro Tip:Clip the thermometer to the pot’s side for a constant, hands-free reading. This lets you focus on piping without worrying about the oil temperature dropping.
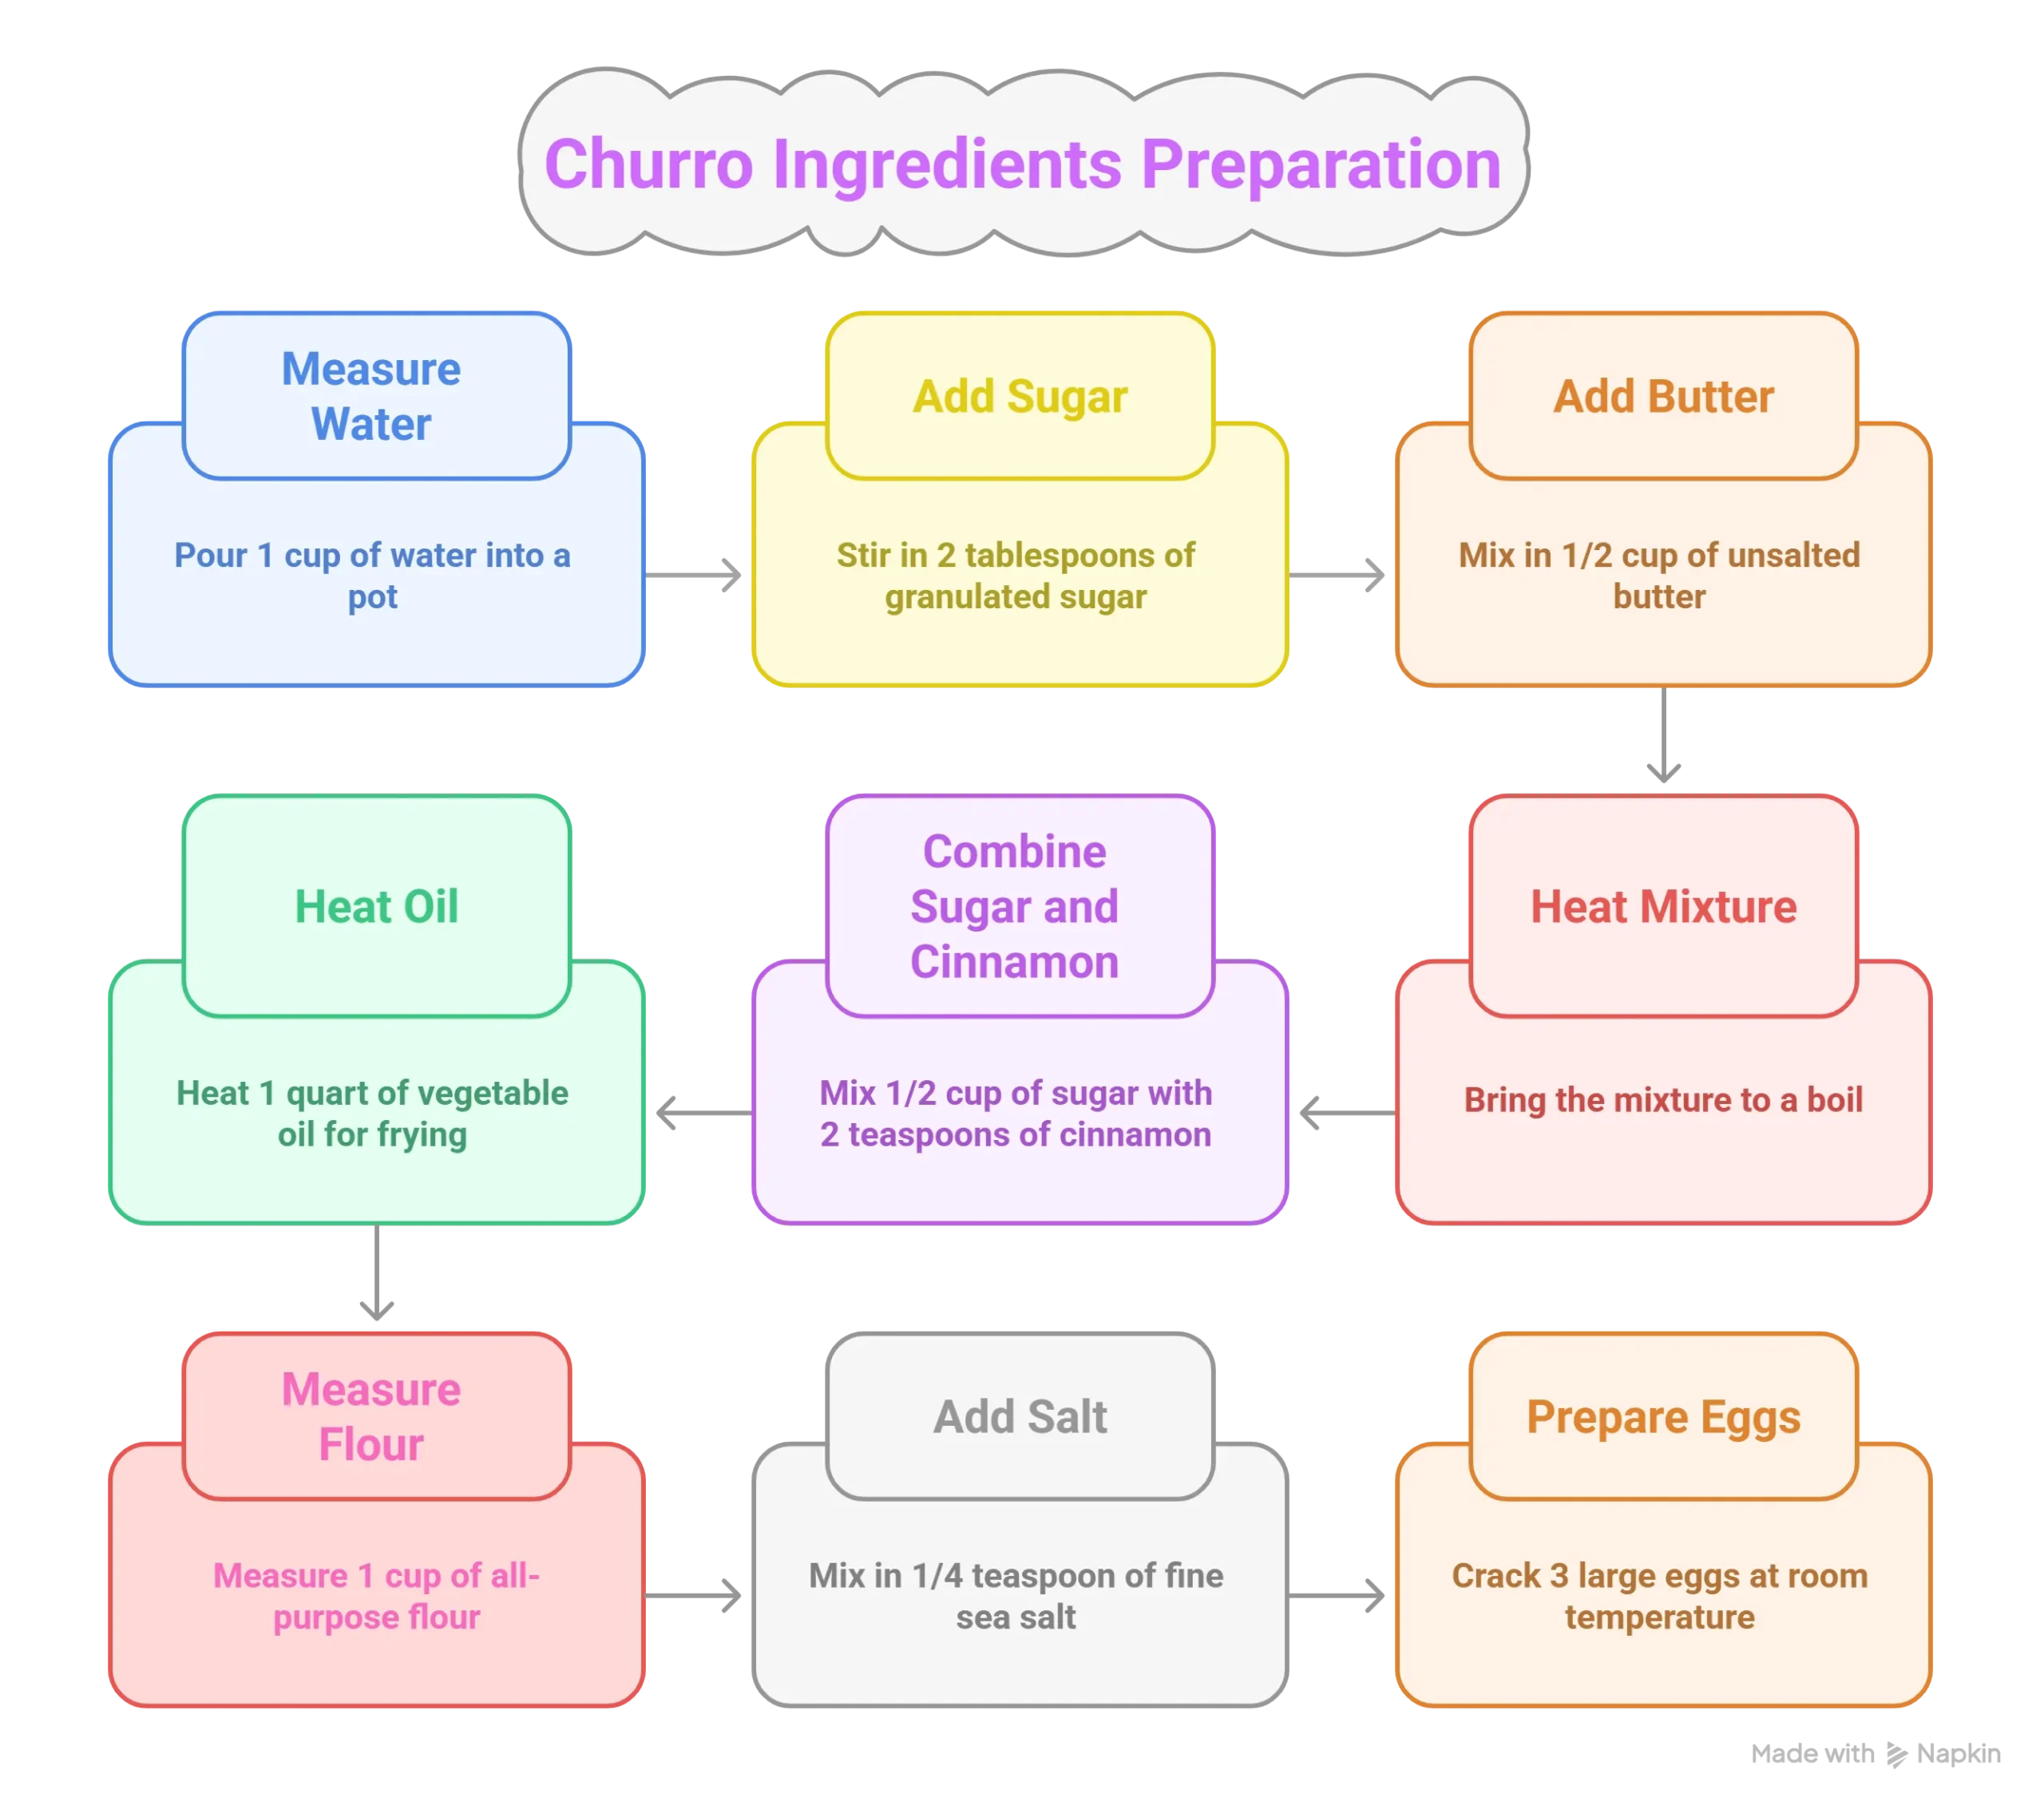
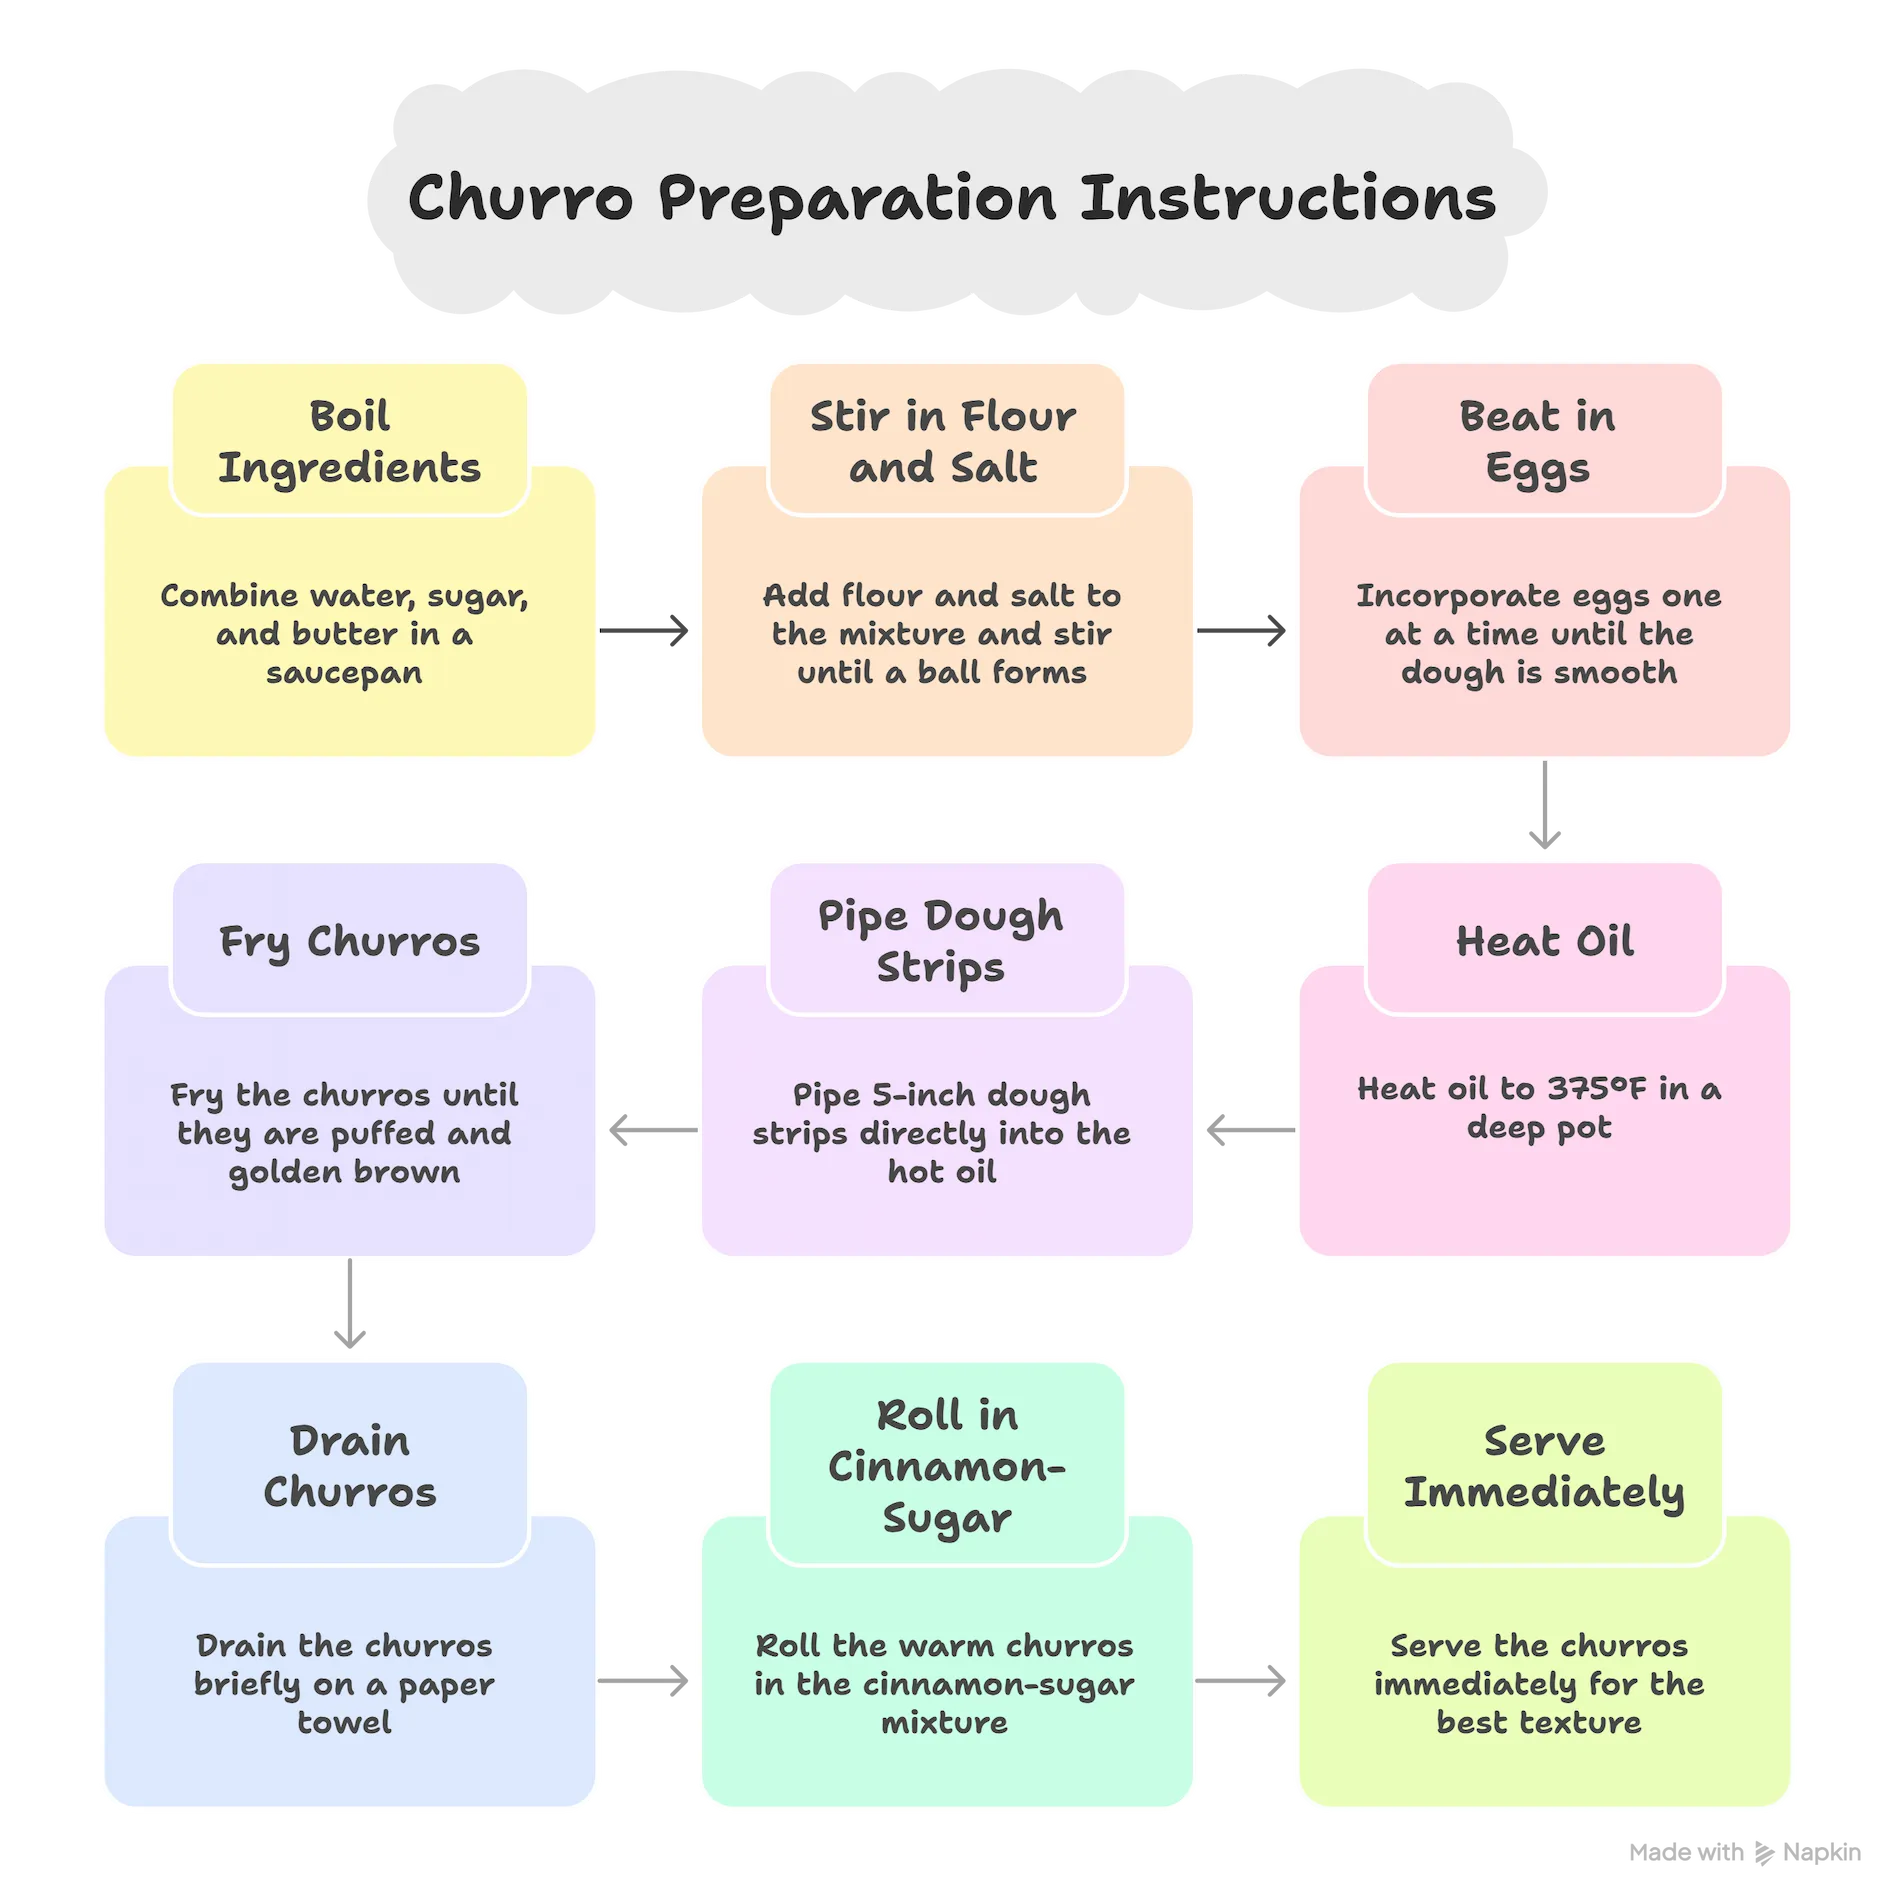
Your 6 Steps to Churro Perfection: A Foolproof Frying Journey
Follow this simple, visual roadmap to transform basic ingredients into golden, crispy homemade churros that rival any street food stall.
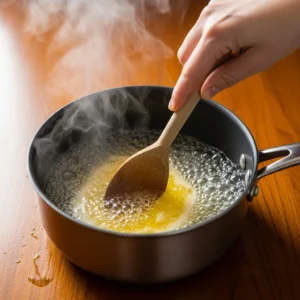
Step 1: Heating the water, melting butter, and sugar together until bubbling.
Step 2: Vigorously stirring in the flour to create a smooth, thick dough ball.
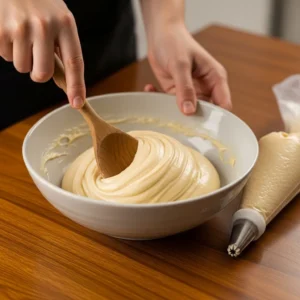
Step 3: Beating eggs into the dough one at a time for a smooth, pipeable consistency.
Step 4: Carefully piping the dough directly into the hot oil to form the churros.
Step 5: Frying the churros until they are puffed up and perfectly golden brown.
Step 6: Draining and immediately rolling the warm churros in cinnamon-sugar.
Creating these perfect churros is an easy, step-by-step process. Paying close attention to each stage of this recipe is the key to achieving that dreamy combination of a crisp shell and a soft, airy center for the ultimate fried dessert.
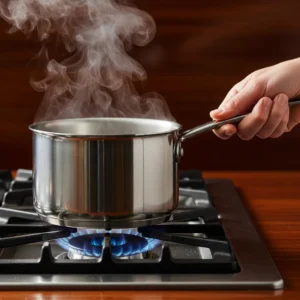
1. Heat the Butter, Water, and Sugar
Combine water, butter, and sugar in your saucepan and bring it to a rolling boil. This initial mixture is the liquid base that cooks the flour and creates the foundation for your churros dough. Pro Tip: For the best texture, ensure the butter is fully melted and the mixture is bubbling vigorously before you add the flour.
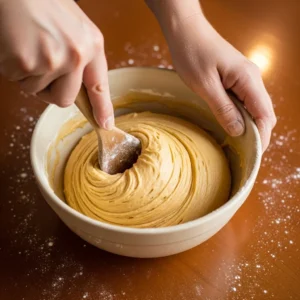
2. Mix in the Flour to Form a Dough
Remove the pan from the heat and immediately add all the flour, stirring vigorously. The ingredients will quickly come together into a smooth, thick ball of dough that pulls away from the sides of the pan. Pro Tip:Stir continuously for about a minute off the heat to cook the flour slightly, which helps the dough absorb the eggs more easily.
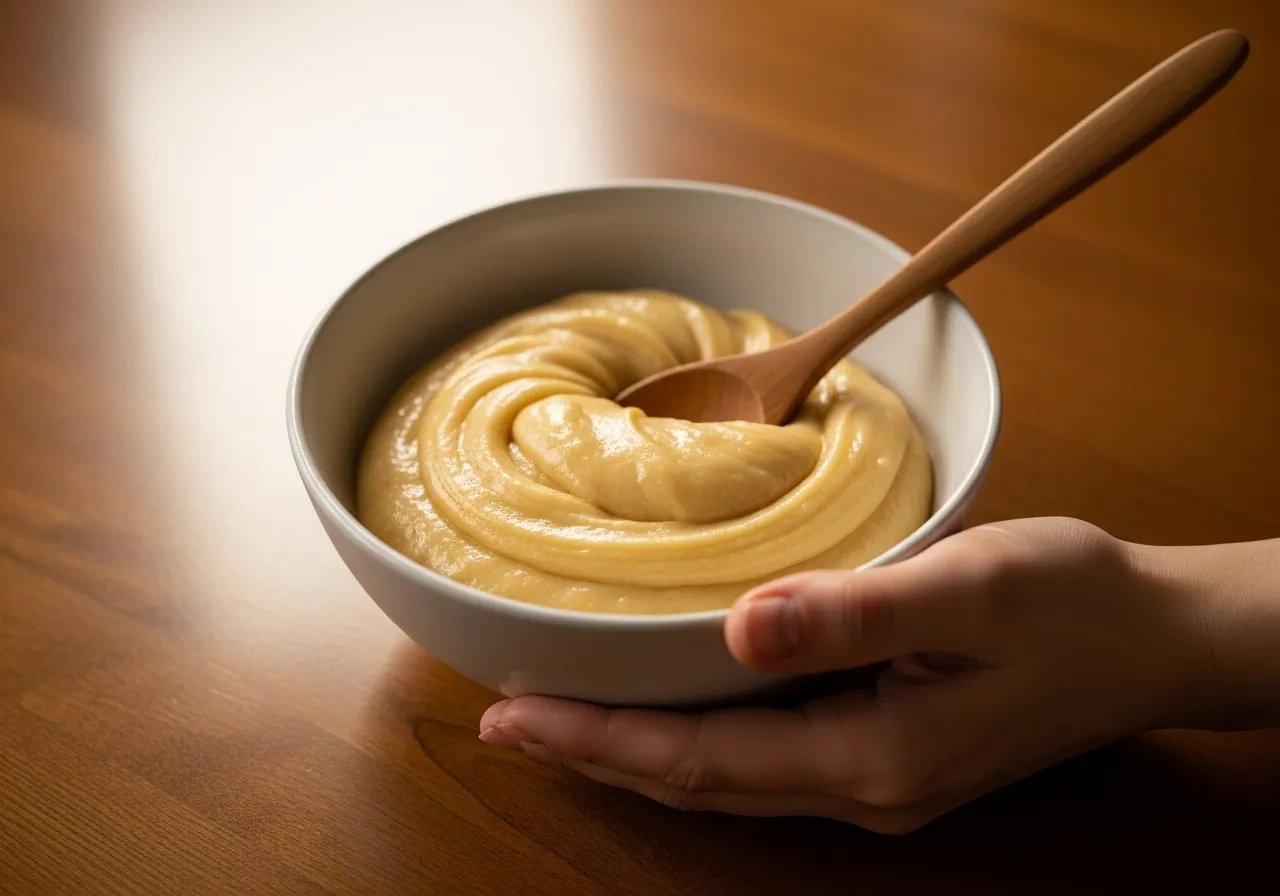
3. Incorporate the Eggs for Richness
Let the dough cool for a few minutes, then beat in the eggs individually. Mix until each egg is fully incorporated and the dough becomes smooth, glossy, and pipeable, essential for the perfect churro shape. Pro Tip:Using room-temperature eggs prevents them from cooking in the warm dough and helps them blend in more smoothly.
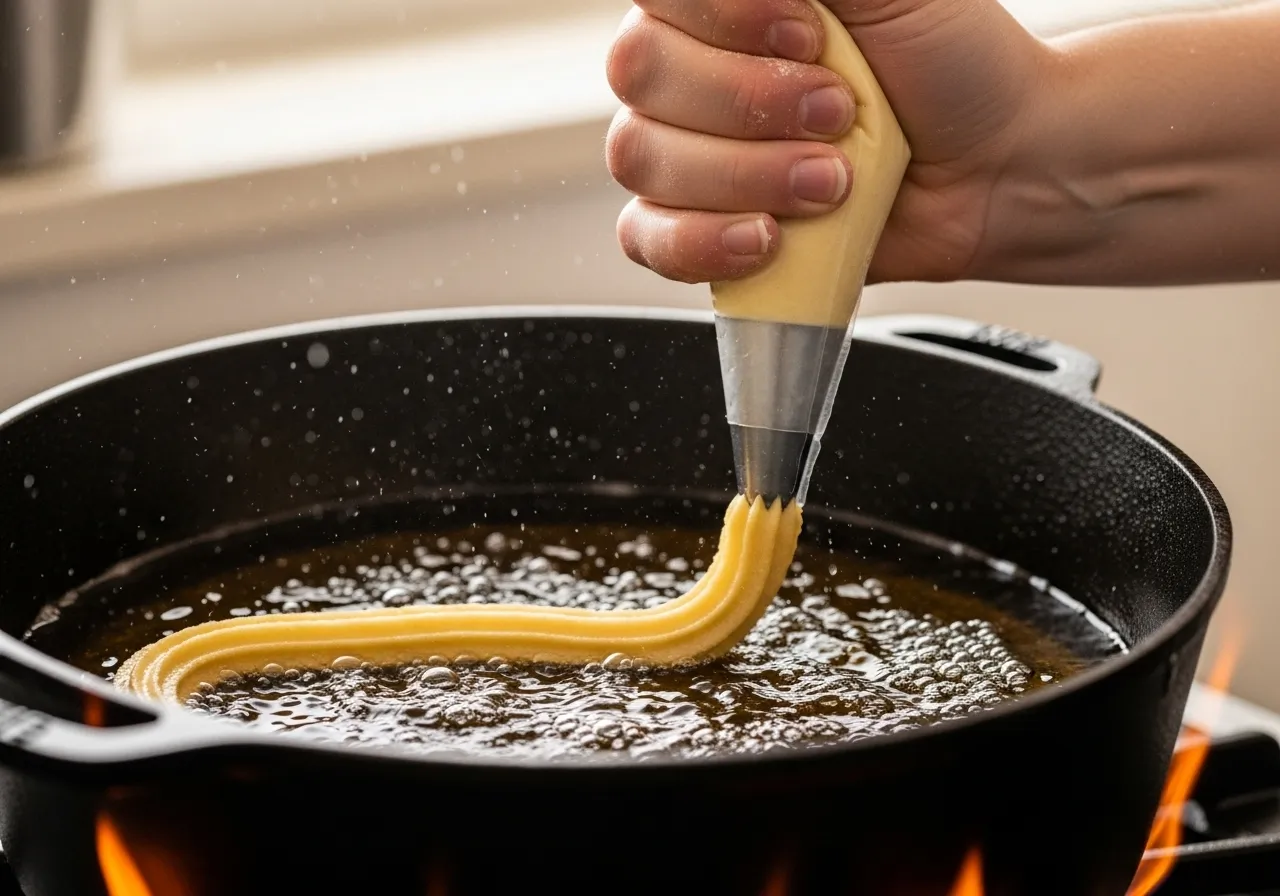
4. Pipe the Dough Directly into Hot Oil
Load your dough into the piping bag and carefully pipe 5-inch strips directly over the pot. Cut the dough cleanly away from the tip and into the hot oil using a knife or kitchen shears. Pro Tip:Pipe a test strip first. If it holds its shape, the oil is ready. If it disperses, the oil is too hot; if it sinks, it is not hot enough.
5. Fry to a Deep Golden Brown
Fry the churros in batches, turning them occasionally with tongs, for about 2-3 minutes per side. They are ready when puffed up and have achieved a uniform, deep golden-brown color. Pro Tip:Do not overcrowd the pot, which will cause the oil temperature to drop and produce oily churros.
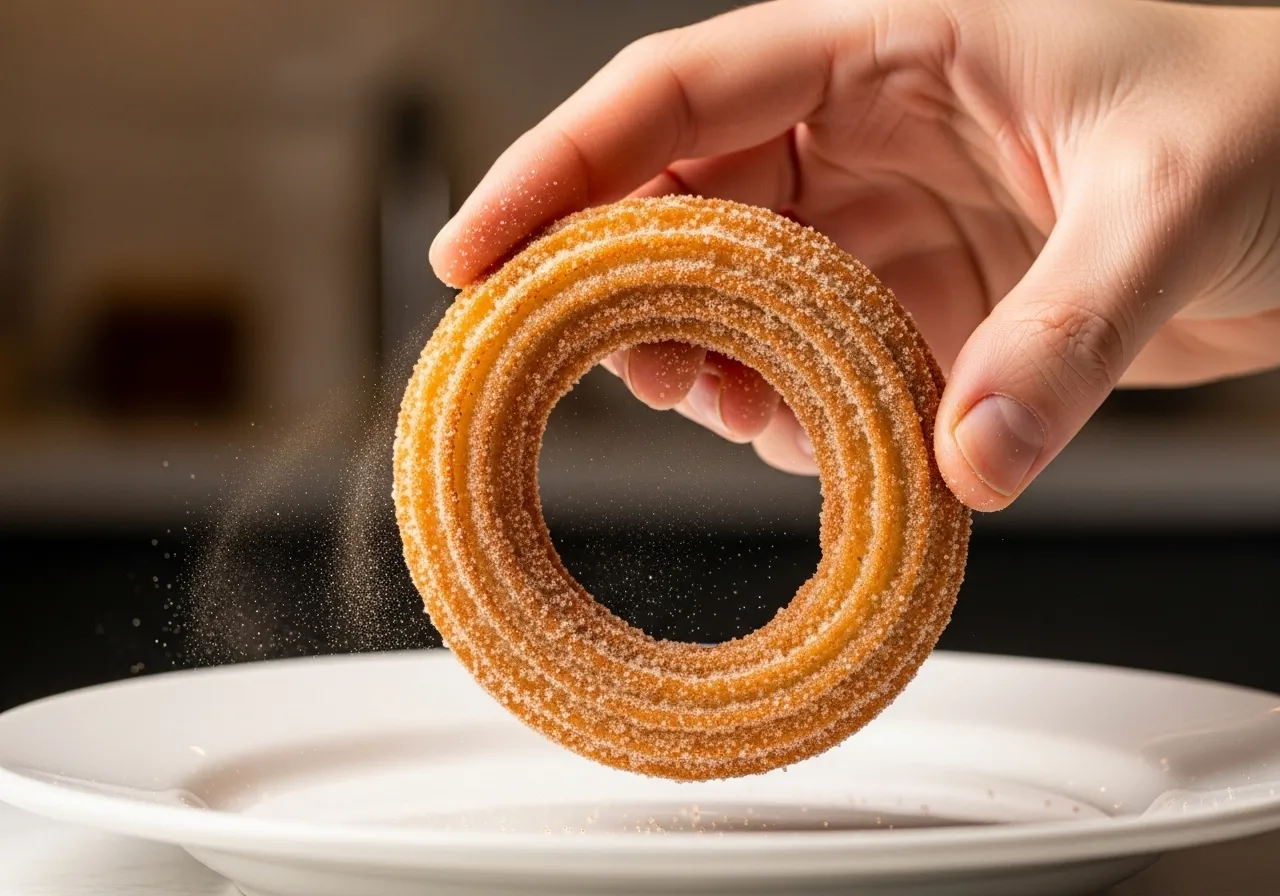
6. Coat Generously in Cinnamon-Sugar
When the churros are removed from the oil, drain them briefly on a paper towel. Then, while still hot, roll them in the cinnamon-sugar mixture, ensuring an even and generous coating on this classic dessert. Pro Tip:Roll the churros in the sugar one at a time while they are still very hot and slightly oily; this helps the coating stick perfectly.
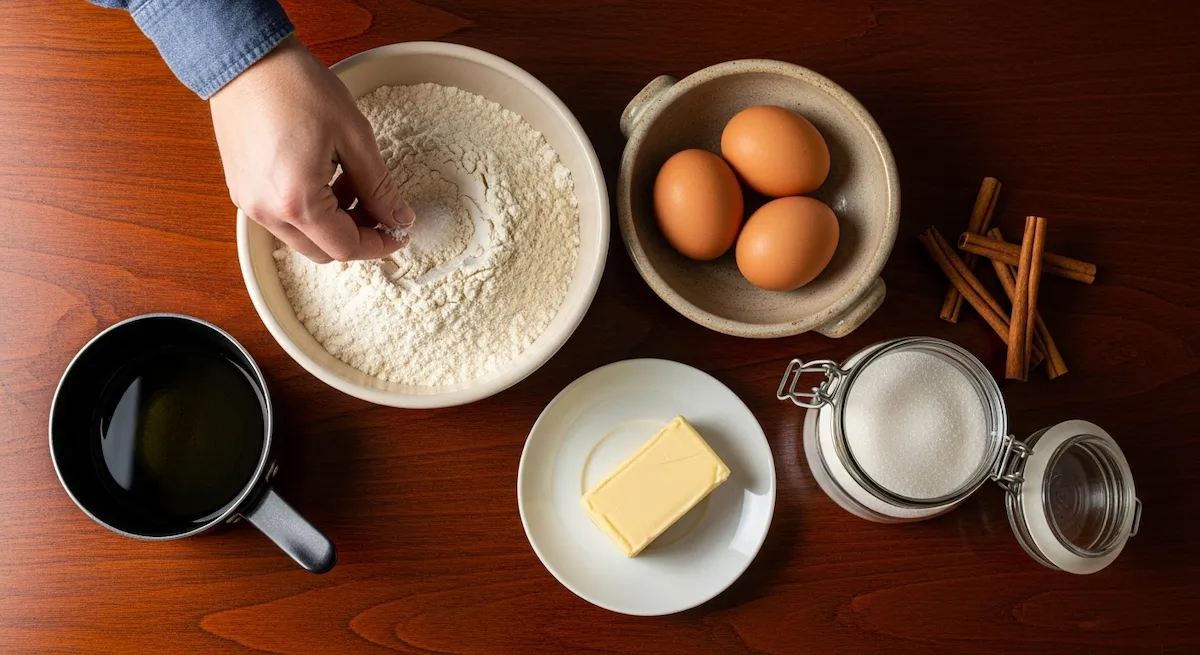
Your At-a-Glance Guide to the Perfect Churro Ingredients
This visual roadmap breaks down the simple, powerful components that create the magic of homemade churros right in your kitchen.
A visual list of everything you need to make easy churros at home.
Understanding your ingredients is the first step to churros’ success. This infographic explains how a handful of simple ingredients combine to create an unforgettable street food experience.
✦ The Foundation Builders: Flour, water, and butter form the classic pâte à choux dough, the essential base for all great churros.
✦ The Richness Agents: Fresh eggs and a touch of sugar are beaten into the dough, creating a rich flavor and that signature airy texture.
✦ The Iconic Coating: A simple mix of cinnamon and sugar creates the classic, irresistible finish of this beloved fried dessert.
Your Ultimate Churros Recipe Card: Print, Save, and Rate!
Everything you need is in this printable card—your go-to guide for making perfect homemade churros anytime.
Share your creation in the comments or on social media with pinterest
We’ve condensed our entire churrosrecipe into this easy-to-follow card. It’s your convenient kitchen companion for creating this delicious treat, with precise measurements and clear instructions to guarantee your success.
✦ Precise Measurements:Use the exact quantities for flawless churros every time, eliminating the guesswork in baking.
✦ Streamlined Instructions: Follow our clear, step-by-step directions to navigate the recipe with confidence and ease.
✦ Expert-Proven Method: This card contains our perfected technique for achieving the ideal crispy exterior and fluffy interior.
We love seeing your creations! If you enjoyed this recipe, please show your support by hitting the stars in the recipe card below.
Your Visual Blueprint for Flawless Churros in 9 Steps
Follow this simple, step-by-step infographic to guide you from dough to delicious, ensuring crispy, golden results every time.
Follow these simple visual steps to create perfect crispy churros.
A great visual guide takes the guesswork out of cooking. This infographic walks you through the key stages of this churrosrecipe for a stress-free and fun cooking journey.
✦ The Dough Mastery: The journey begins with cooking the base and piping the dough, the most crucial steps for shaping.
✦ The Frying Precision: This stage focuses on maintaining the perfect oil temperature to achieve a crispy, non-greasy churro.
✦ The Final Finish: The process ends with the signature coating, transforming them into the perfect sweet treat.
Your Journey to Perfect Homemade Churros is Complete!
You now hold the secret to creating unbelievably crispy, fluffy churros that will fill your kitchen with joy and your family with delight.
This easy churros recipe is more than just a list of steps; it’s your invitation to experience the magic of a classic street food treat, reinvented for your home. We’ve poured all our testing and passion into ensuring your success, making this the last churros recipe you’ll ever need.
➣ You’ve mastered the simple art of the pâte à choux dough for an airy, light interior.
➣ You can now confidently fry to a perfect golden brown for that signature crispy bite.
➣ Your kitchen now smells like a festive fairground, filled with the warm aroma of cinnamon sugar.
Embrace Your New Go-To Dessert
➣ You can create a fun, memorable treat for any occasion, big or small.
➣ You have a foolproof method turns simple ingredients into an extraordinary dessert.
➣ You’ve unlocked a family-friendly cooking project that’s as enjoyable to make as it is to eat.
🇺🇸 1. American Fair-Style
→ Coating: Roll in cinnamon-sugar with a hint of pumpkin spice
→ Serving: Giant portions with caramel and chocolate drizzle
→ Perfect For: Classic state fair experience with homemade churros
🇬🇧 2. British Afternoon Tea
→ Shape: Create smaller, delicate churro sticks or rings
→ Dipping: Serve with clotted cream and strawberry jam
→ Elegant Twist: Sophisticated take on traditional churros
🇦🇺 3. Australian Lamington
→ Coating: Dip in chocolate sauce, then in shredded coconut
→ Filling: Inject with raspberry jam using a piping tip
→ Unique Creation: Tropical twist on classic churros
🇨🇦 4. Canadian Maple
→ Sweetener: Replace sugar with maple sugar in coating
→ Dipping: Warm maple syrup mixed with cinnamon
→ Seasonal: Perfect for autumn homemade churros
🇫🇷 5. French Patisserie
→ Flavor: Add orange zest to the churro dough
→ Coating: Mix lavender sugar with the cinnamon
→ Elegant: Parisian café-style homemade churros
🇯🇵 6. Japanese Matcha
→ Flavor: Add matcha powder to the dough mixture
→ Coating: Matcha sugar with white chocolate drizzle
→ Trendy: Modern green tea twist on churros
Pro Tip: Start with the basic homemade churros recipe, then experiment with one international variation at a time. This lets you discover your favorite global twist while mastering the fundamental technique first!
FAQs: Your Homemade Churros Questions Answered!
Q1. Why are my churros turning out oily instead of crispy?
Oily churros usually mean your oil temperature is off. Achieve perfect crispy texture by avoiding these common mistakes:
Oil Too Cool: Oil below 375°F absorbs into the dough instead of sealing it.
Overcrowding: Too many churros drop the oil temperature dramatically.
Pro Tip: If your churros dough still feels too stiff, place the bowl over a warm water bath for 2 minutes while stirring – this magical trick transforms stubborn dough.
Q4. Can I make churro dough ahead of time for a party?
Perfect party planning is possible with our make-ahead timeline for stress-free entertaining:
24 Hours Ahead: Prepare dough, refrigerate in a piping bag.
4 Hours Ahead: Mix cinnamon-sugar coating, store airtight.
2 Hours Ahead: Set up the frying station with all equipment ready.
30 Minutes Before Serving: Bring dough to room temperature.
Pro Tip: The flavor of your homemade churros dough improves after resting overnight, making it the perfect do-ahead party treat.
Q5. What’s the secret to getting that perfect hollow center?
The magical hollow center comes from proper technique. Master these key elements:
Proper Dough Cooking: Cook the flour mixture until it forms a clean ball.
Egg Incorporation: Beat vigorously until the dough is smooth and shiny.
Hot Oil: 375°F oil creates instant steam for puffing.
Star Tip Size: Use a large star tip (at least ½ inch) for proper expansion.
Pro Tip: Listen for the sizzle when the dough hits the oil—that explosive sound means you’re creating the perfect airy texture in your churros.
Q6. Why won’t my cinnamon-sugar coating stick to the churros?
A perfect coating requires perfect timing. Ensure your cinnamon-sugar sticks with these tricks:
Temperature Timing: Coat within 30 seconds of removing from oil.
Proper Draining: Drain excess oil, but don’t let them cool completely.
Coating Surface: Use a wide, shallow bowl for even coverage.
Sugar Freshness: Ensure your sugar isn’t clumpy or hardened.
Pro Tip: Roll churros in cinnamon sugar while they’re still slightly oily from frying—the residual oil is the perfect edible glue for this sweet street food.
Q7. Can I freeze leftover churros and reheat them later?
Our churros freeze beautifully! Preserve that fresh-fried magic with these techniques:
Airtight Storage: Transfer to freezer bags, remove all air.
Reheating Method: Air fryer at 375°F for 4-5 minutes works best.
Oven Option: Bake at 400°F on a rack for 6-8 minutes until crisp.
Pro Tip: Freeze churros before the cinnamon-sugar coating, then add fresh coating after reheating – this preserves that just-made texture and flavor.
Q8. What are the best dipping sauces beyond chocolate?
Elevate your churros experience with these incredible dipping sauce options:
Dulce de Leche: Creamy caramel sauce made from simmered milk.
Raspberry Coulis: Fresh raspberries blended with sugar and lemon.
Mexican Cajeta: Goat’s milk caramel with cinnamon notes.
Lemon Curd: Bright, tangy contrast to sweet churros.
Pro Tip: Create a churros dipping station with multiple sauce options. This transforms your homemade churros into an interactive dessert experience everyone loves.


")
")

")
")

")