Simple, high-quality ingredients are the secret to the best creamy hummus.
No Peeling, No Special Tools, Just Perfectly Creamy & Dreamy Results.
Are you tired of grainy, store-bought dips and complicated recipes that promise smoothness but deliver disappointment? This easy homemade hummus recipe is your ultimate guide. It features a unique warm-and-cold technique that guarantees a silky, luxurious texture with a rich, balanced flavor—achieved with a straightforward trick. It’s the guaranteed way to master a foundational kitchen skill and bring a restaurant-quality, creamy dip to your simplest snacks or grandest gatherings, transforming basic ingredients into a confident culinary triumph.
Why This Technique is a Game-Changer for Making Hummus
Before you grab your blender… here’s what makes this method a fundamental breakthrough for anyone craving a perfect, easy appetizer with stunning simplicity.
Consistently Creamy Texture, Achieved with a Simple Process
➤ The Warm Chickpea Advantage: Gently heating the chickpeas softens them for an ultra-smooth blend.
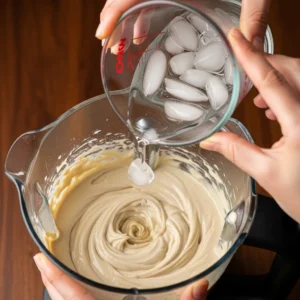
➤ The Ice Water Emulsion: Using cold water whips the tahini into a light, fluffy base.
➤ The High-Power Blending Magic: A patient blend time is the non-negotiable key to creaminess.
A Truly Effortless and Foolproof Method
▣ The 1-Trick Promise: Transform your dip with a simple temperature contrast.
▣ The Foolproof Visual Cues: Watch the tahini whip from thick and dark to pale and creamy.
▣ The Ultimate Crowd-Pleasing Dip: A classic, healthy snack that impresses every single time.
Pro Tip:For the absolute smoothest results, save a tablespoon of the warm chickpea liquid (aquafaba) and add it during the final blend for an extra silky, light texture.
Our Mission to Perfect Your Homemade Hummus Journey
🔍 1. The Quest for Perfection
→ Flawless Texture: We tested countless methods to eliminate gritty homemade hummus forever
→ Simple Science: Our warm-and-cold technique uses food principles for guaranteed creaminess
→ Accessible Excellence: Making restaurant-quality homemade hummus achievable in any kitchen
💡 2. The “Why” Behind Our Method
→ Pain Point Solution: Explicitly created to solve common homemade hummus frustrations
→ Time-Respecting: Designed for busy cooks who want perfect results without complicated steps
→ Confidence Building: Every step explained to make you feel like a hummus expert
👨🍳 3. From Our Test Kitchen
→ Family-Tested: This homemade hummus recipe passed the harshest critics – our own families
→ Multiple Iterations: We made over 50 batches to perfect the ingredient ratios and technique
→ Real Kitchen Approved: Tested in regular home kitchens, not just professional studios
🔄 4. What “Reinvented” Really Means
→ Method Innovation: We didn’t change the classic flavors, just perfected the technique
→ Process Simplification: Eliminated unnecessary steps that don’t contribute to better homemade hummus
→ Knowledge Sharing: We explain the “why” behind each step for empowered cooking
🌍 5. Your Global Kitchen Companion
→ Authentic Roots: Respecting traditional Middle Eastern hummus-making principles
→ Modern Adaptation: Updating techniques for today’s kitchen tools and busy lifestyles
→ Universal Appeal: Creating homemade hummus that delights both purists and adventurous eaters
🤝 6. Join Our Cooking Community
→ Shared Success: We celebrate every perfect batch of homemade hummus you create
→ Continuous Learning: Your feedback helps us improve and create more revolutionary recipes
→ Cooking Confidence: Our goal is to make you feel proud of every dish you create
Pro Tip: Remember that perfect homemade hummus is about understanding the technique, not just following a recipe – once you master our method, you’ll create creamy dips effortlessly!
From My Kitchen to Yours: A Passion for the Perfect Creamy Dip
The “Reinvented” Journey to Truly Effortless Homemade Hummus
This flawless homemade hummus recipe was born from a mission to end gritty, bland, or complicated dips for good. We’ve perfected this simple, family-tested method to turn a frustrating kitchen task into a quick and satisfying ritual, guaranteed to deliver the most creamy texture your entire family will love.
Here’s the Care We Poured Into Every Bite:
➔ Inspired by the quest for a luxuriously smooth, flavorful, and perfectly creamy homemade hummus every single time.
➔ Born from the belief that creating a restaurant-quality easy appetizer should be fast and straightforward.
➔ Crafted around a unique warm-and-cold technique because we value a foolproof method and your valuable time.
➔ Family tested and approved by all ages countless times to guarantee a healthy snack that everyone will devour.
➔ Designed to be the last hummus recipe you’ll ever need to search for.
Pro Tip:For the creamiest results, blend the tahini and lemon juice for a full minute before adding anything else.
🌱 1. Naturally Vegan & Plant-Based
→ Already Perfect: This classic homemade hummus recipe is naturally vegan-friendly
→ Protein Power: Chickpeas and tahini provide complete plant-based nutrition
→ Dairy-Free Delight: No hidden dairy ingredients – perfect for vegan lifestyles
🚫 2. Gluten-Free Confidence
→ Naturally Gluten-Free: All base ingredients are safe for gluten-sensitive diets
→ Serving Safety: Pair with gluten-free crackers, veggie sticks, or corn chips
→ Cross-Contamination: Use clean utensils and surfaces when preparing homemade hummus
👶 3. Kid-Friendly Variations
→ Milder Version: Reduce garlic and lemon for sensitive young palates
→ Fun Shapes: Serve with colorful veggie sticks and fun-shaped pita chips
→ Interactive Dining: Let kids build their own homemade hummus snack plates
💧 4. Oil-Free & Light Options
→ Skip the Oil: Omit olive oil entirely – the base homemade hummus is still creamy
→ Aquafaba Magic: Use extra chickpea liquid for moisture without added fats
→ Lighter Garnish: Top with fresh herbs, paprika, or toasted sesame seeds instead
🌶️ 5. Flavor Boosters for Restricted Diets
→ Low-Sodium: Use no-salt-added chickpeas and adjust salt to your needs
→ Spice It Up: Add smoked paprika, cumin, or cayenne for flavor without salt
→ Herb Infusion: Blend in fresh rosemary, dill, or parsley for a vibrant taste
🥜 6. Allergy-Friendly Adaptations
→ Seed Alternative: Replace tahini with sunflower seed butter for nut-free versions
→ Lemon Zest: Enhance flavor with extra lemon zest if reducing juice for acid sensitivity
→ Customizable: This homemade hummus adapts easily to most food allergies
Pro Tip: Always communicate dietary needs when sharing your homemade hummus – a simple note helps everyone enjoy your delicious creation safely and happily!
The “Aha!” Moment: Unlocking the Secret to Silky Smoothness
The Simple Science Behind Our Life-Changing Creamy Technique
This unique warm-and-cold method is the heart of our flawless homemade hummus because it uses simple food science to guarantee a perfect creamy texture. We designed this technique to eliminate the guesswork and frustration, turning a scientific principle into your most straightforward path to dip perfection.
Here’s the Simple Science Behind the Magic:
✦ Warm Chickpeas Blend Easier: Gently heating them breaks down their rigid structure, leading to a smoother puree than cold chickpeas ever could.
✦ Ice Water Whips the Tahini: The cold water whips the tahini into a light, airy emulsion, creating a fluffy base for your homemade hummus.
✦ The Temperature Contrast is Key: This contrast between warm chickpeas and cold liquid is the one-trick secret that makes the magic happen.
✦ Patience is Your Secret Weapon: A full four-minute blend ensures every fiber is transformed into a luxuriously silky dip.
✦ It’s All About the Emulsion: This method perfectly binds the oils and liquids, preventing a greasy or separated easy appetizer.
Pro Tip:Save a bit of the warm chickpea liquid to loosen the final blend for a smoother result.
5 Flavor Twists to Keep Your Hummus Exciting & Fresh
🔥 1. Roasted Red Pepper & Smoked Paprika
→ Sweet & Smoky: Blend in ½ cup roasted red peppers + 1 tsp smoked paprika
→ Vibrant Color: Creates a beautiful orange-red hue that delights the eyes
→ Crowd Pleaser: The most requested variation for parties and gatherings
🌿 2. Spicy Cilantro-Jalapeño Lime
→ Fresh Heat: Add ½ cup fresh cilantro + 1 seeded jalapeño + extra lime juice
→ Mexican Fusion: Perfect for taco nights or as a burrito bowl topping
→ Cooling Balance: Serve with crisp cucumber slices to tame the spice
🍋 3. Lemon-Za’atar Herb Garden
→ Mediterranean Magic: Mix in 2 tbsp za’atar spice + extra lemon zest
→ Aromatic Bliss: The herbal notes transform your homemade hummus instantly
→ Authentic Touch: Classic Middle Eastern flavors that feel sophisticated
🍅 4. Sun-Dried Tomato & Basil
→ Italian Inspired: Blend ¼ cup oil-packed sun-dried tomatoes + fresh basil
→ Rich Umami: Intense tomato flavor creates a robust, savory homemade hummus
→ Pasta Alternative: Use as a flavorful spread on sandwiches and wraps
🥑 5. Creamy Avocado & Lime
→ Ultra-Creamy: Mix in 1 ripe avocado + extra lime juice right before serving
→ California Style: Fresh, green, and perfect for warm-weather entertaining
→ Quick Enjoyment: Best consumed immediately for optimal color and freshness
✨ 6. Your Creative Canvas
→ Start Small: Add variations gradually and taste as you blend
→ Texture Play: Some add-ins, like nuts, are better as toppings than blends
→ Seasonal Fun: Let fresh, seasonal ingredients inspire your homemade hummus creations
Pro Tip: Always start with our perfect base homemade hummus recipe, then add your flavor variations – this ensures the creamy texture remains flawless while the flavors transform!
The Tahini Talk: Your Secret Weapon for Rich, Non-Bitter Flavor
How to Pick the Perfect Tahini for a Rich, Smooth, and Non-Bitter Base
Choosing the right tahini is the most critical step for a beautifully balanced homemade hummus with zero bitterness. We’ve tested countless brands to ensure you pick a winner every time, making your journey to the perfect creamy dip effortless and foolproof.
Here’s Your Foolproof Guide to Perfect Tahini:
➣ Check the Ingredients List: It should say 100% sesame seeds, nothing else. Avoid brands with added oils or stabilizers.
➣ Opt for a Runny Consistency: The texture should be similar to a thin nut butter, not a thick, stiff paste. This blends into a smoother homemade hummus.
➣ Always Shake the Jar: Natural separation is normal! A good shake re-incorporates the oils for a consistent flavor and perfect texture.
➣ Trust Your Taste Buds: Give it a quick taste. It should be nutty and creamy, not unpleasantly sharp or bitter.
➣ Light vs. Dark Doesn’t Matter: Focus on the ingredient list and consistency more than the color for your easy appetizer.
Pro Tip:Store your tahini jar upside down to make remixing easier.
⏰ 1. The Impatience Penalty
→ Rushed Blending: Not blending long enough creates gritty, uneven texture
→ Time Investment: Our 4-minute blend is non-negotiable for perfect homemade hummus
→ Visual Cue: Blend until completely smooth with no visible chickpea particles
🌡️ 2. The Temperature Trap
→ Cold Chickpeas: Using straight-from-the-can chickpeas prevents proper breakdown
→ Warm Advantage: Heating chickpeas softens their structure for smoother homemade hummus
→ Simple Fix: Just 10 minutes of warming transforms your final results dramatically
🌀 3. The Skipped Foundation
→ Unwhipped Tahini: Not aerating the tahini and lemon first creates a dense texture
→ Fluffy Base: The whipped emulsion is crucial for light, creamy homemade hummus
→ Visual Test: Blend until the tahini mixture turns pale and doubles in volume
💧 4. The Liquid Mismatch
→ Wrong Temperature: Using room temperature water instead of ice water
→ Emulsion Science: The temperature shock creates the perfect creamy consistency
→ Ice Magic: Always use genuinely ice-cold water for the fluffiest results
🧂 5. The Sequencing Error
→ Ingredient Order: Adding everything at once instead of building layers
→ Method Matters: Our specific order ensures proper emulsification every time
→ Trust the Process: Follow the sequence for guaranteed perfect homemade hummus
🔧 6. The Equipment Compromise
→ Weak Blender: Using underpowered equipment that can’t achieve a smooth puree
→ Power Requirement: A high-speed blender is essential for restaurant-quality texture
→ Alternative Options: Food processor works but requires longer processing time
Pro Tip: Avoid all these saboteurs by following our tested method exactly – we’ve made every possible mistake so you don’t have to, ensuring your homemade hummus turns out perfectly creamy every single time!
The Chickpea Conundrum: Canned vs. Dried – Your Easy Choice
Canned vs. Dried: Your Guide to Choosing the Best Chickpeas for Ultimate Creaminess
We believe a great homemade hummus should be accessible, so we champion canned chickpeas’ convenience for an unbeatable, easy appetizer. But for those seeking the ultimate creamy texture, we’ve explored the dried chickpea path so you can confidently make an informed choice.
Here’s Our Tested Breakdown for You:
◈ Canned for Convenience: Perfectly wonderful! They are our go-to for a quick, consistently creamy homemade hummus in minutes. Just be sure to warm them first.
◈ Dried for Ultimate Smoothness: Cooking dried chickpeas until tender gives you the absolute smoothest possible puree and superior flavor control.
◈ No Soaking Required Trick: You can skip the overnight soak! A quick boil with baking soda softens dried chickpeas remarkably fast.
◈ The Texture is Noticeable: Dried, cooked chickpeas blend into a fluffier, lighter hummus with an unparalleled silky dip quality.
◈ The Choice is Yours: Both methods create a fantastic dip, so choose based on your time and how “perfect” you want your homemade hummus to be.
Pro Tip:For canned chickpeas, warming them in their liquid for 10 minutes is the non-negotiable step for creaminess.
Quick Fixes for Hummus That’s Too Thick, Thin, or Bland
🥄 1. Too Thick & Paste-Like
→ Liquid Rescue: Add warm water 1 tablespoon at a time while blending
→ Aquafaba Boost: Use reserved chickpea liquid for extra flavor and creaminess
→ Oil Solution: Drizzle in extra olive oil gradually until the desired consistency
💧 2. Too Thin & Runny
→ Thickening Agent: Blend in 1-2 tablespoons of additional tahini
→ Chickpea Power: Add more warmed chickpeas to absorb excess liquid
→ Chill Method: Refrigerate for 1-2 hours to allow natural thickening
👅 3. Too Bland & Lacking Flavor
→ Salt Savior: Add ¼ teaspoon salt at a time, tasting after each addition
→ Lemon Lift: Squeeze in fresh lemon juice until flavors brighten noticeably
→ Garlic Kick: Blend in an extra small garlic clove for aromatic depth
😖 4. Too Bitter or Sharp
→ Sweet Balance: Add ¼ teaspoon honey or maple syrup to counteract bitterness
→ Creamy Calm: Mix in 1 tablespoon Greek yogurt or more tahini to mellow
→ Dilution Method: Increase chickpea quantity to dilute overpowering flavors
🛢️ 5. Too Oily or Greasy
→ Starch Solution: Blend in 1 tablespoon of the warm chickpea cooking liquid
→ Lemon Correction: Add extra lemon juice to help emulsify the oils properly
→ Chill & Stir: Refrigerate, then stir vigorously to reincorporate separated oils
🎯 6. Perfect Consistency Guide
→ Ideal Texture: Should slowly slump when scooped, not hold stiff peaks
→ Spread Test: Should easily spread on pita without tearing the bread
→ Dip Standard: Should coat a vegetable stick evenly without dripping off
Pro Tip: Always fix your homemade hummus while it’s still in the blender – this ensures perfect incorporation and saves you from washing extra bowls. Remember, most issues can be solved with simple adjustments!
Make-Ahead Magic: Always Have Fresh Hummus on Hand
Simple Storage & Freezing Tips to Keep Your Hummus Fresh and Delicious
Your perfect batch of homemade hummus can be a gift that keeps on giving with the right storage know-how. We’ve perfected these methods to ensure your creamy dip stays as fresh and delicious as the moment you made it, making healthy snacking effortless all week.
Here’s How to Keep It Perfectly Fresh:
★ Airtight is the Rule: Always store your homemade hummus in a sealed container in the fridge to protect its flavor and texture.
★ The Olive Oil Blanket: Pour a thin layer of extra virgin olive oil on top before sealing to create a barrier against air that keeps it moist.
★ The Fridge Lifespan: When stored properly, your hummus will stay fresh and vibrant for 5-7 days.
★ Yes, You Can Freeze It! Freeze portions for up to 3 months. Thaw overnight in the fridge for a quick, easy appetiser.
★ Revive After Thawing: After freezing, give it a quick stir or a brief blend to bring back its original creamy texture.
Pro Tip:Let it sit at room temperature for 15 minutes before serving for the best flavor.
🏪 1. The Canned Chickpea Confession
→ Professional Secret: Many restaurants use quality canned chickpeas for consistency
→ Time Savior: No one has time to cook dried beans during busy dinner service
→ Quality Focus: They invest effort in technique, not just ingredient sourcing
🔥 2. The Warming Technique Revelation
→ Universal Practice: Nearly all pros warm their chickpeas before blending
→ Texture Magic: Heating breaks down cell structure for smoother homemade hummus
→ Simple Truth: This one step separates amateur from professional results
⏱️ 3. The Blending Marathon
→ Extended Processing: Restaurants blend much longer than home cooks realize
→ Patience Pays: Their machines run 5-7 minutes for velvet-like homemade hummus
→ Power Matters: Commercial blenders have stronger motors for faster results
🧊 4. The Ice Water Illusion
→ Temperature Trick: The shock of ice water creates lighter homemade hummus
→ Science Hack: Cold prevents tahini from breaking during emulsion
→ Simple Genius: Anyone can replicate this with ordinary ice cubes
💰 5. The Cost-Saving Reality
→ Bulk Buying: Restaurants purchase tahini in gallons, not tiny jars
→ Markup Magic: The same homemade hummus costs them pennies but sells for dollars
→ Smart Shopping: You can buy quality ingredients in bulk and save significantly
🎭 6. The Presentation Deception
→ Swirl Perfection: They use the back of a spoon for that iconic swirl pattern
→ Oil Control: Drizzle oil in the swirl groove to prevent soaking the entire surface
→ Garnish Strategy: Place herbs strategically to hide any imperfections
Pro Tip: Now that you know their secrets, you can create restaurant-quality homemade hummus for a fraction of the cost. The real magic isn’t in expensive ingredients – it’s in these simple techniques we’ve revealed!
Hummus for Health: A Powerhouse in Every Bite
Nourish Your Body: The Surprising Health Benefits in Every Scoop
Indulging in this homemade hummus is a choice you can feel genuinely good about, far beyond its incredible taste. We crafted this recipe for pleasure and to be a nourishing, easy appetizer that actively contributes to your well-being with every scoop.
Here’s the Nutritional Goodness You’re Enjoying:
♡ Plant-Based Protein Power: Chickpeas and tahini provide a satisfying combo of protein and fiber, keeping you full and energized.
♡ Heart-Healthy Fats: The sesame seeds in tahini are rich in good fats that support a healthy heart and absorb vitamins.
♡ A Vitamin & Mineral Boost: This creamy dip is a natural source of iron, folate, and bone-supporting minerals like calcium and phosphorus.
♡ Gut-Friendly Fiber: The chickpeas promote excellent digestive health, making this a smart snack for your gut.
♡ Wholesome Energy: It’s a perfect fuel source, providing steady energy without the crash of processed snacks.
Pro Tip:Pair it with veggie sticks for an extra vitamin and fiber boost.
📅 Monday: Classic Dip Day
→ Fresh Start: Serve your homemade hummus with crisp veggie sticks and pita
→ Lunchbox Ready: Portion into small containers for easy grab-and-go snacks
→ Family Favorite: Perfect after-school snack or pre-dinner appetizer
🥪 Tuesday: Sandwich Spread Revolution
→ Mayo Alternative: Spread homemade hummus on wraps and sandwiches instead
→ Flavor Boost: Layer with turkey, avocado, and spinach for a healthy lunch
→ Veggie Power: Use as a base for veggie sandwiches with cucumber and sprouts
🥗 Wednesday: Salad Dressing Transformation
→ Creamy Dressing: Thin homemade hummus with lemon juice for salad dressing
→ Protein Packed: Drizzle over grain bowls with quinoa and roasted vegetables
→ No Waste: Use the last of the batch before making a fresh homemade hummus
🍝 Thursday: Pasta Sauce Surprise
→ Creamy Pasta: Thin homemade hummus with pasta water for instant sauce
→ Quick Dinner: Toss with warm pasta, cherry tomatoes, and fresh herbs
→ Kid-Approved: A sneaky way to add protein and nutrients to pasta night
🍳 Friday: Breakfast Upgrade
→ Toast Topper: Spread homemade hummus on toast with sliced radishes
→ Egg Companion: Serve alongside scrambled eggs instead of heavy sauces
→ Morning Boost: Provides sustained energy from protein and complex carbs
🔄 Weekend: Batch & Refresh
→ Make Ahead: Prepare a new batch of homemade hummus for the coming week
→ Flavor Switch: Try one of our variation ideas to keep things exciting
→ Freeze Option: Portion and freeze half for emergency quick meals
Pro Tip: Make a double batch of homemade hummus every Sunday – one for immediate use and one to freeze. This ensures you have a healthy, versatile base ready for quick meals throughout your busy week!
Your Hummus Toolkit: The Only 3 Tools You Need for Success
The Only 3 Tools You Need for Restaurant-Quality Results at Home
Equipment 1: Using a blender and warm chickpeas is key for a super smooth hummus texture.
Equipment 2: Gently warming the chickpeas on the stovetop before blending for easier pureeing.
Equipment 3: Fresh lemon juice and ice water are essential for the flavor and texture of creamy hummus.
Forget fancy gadgets; our streamlined method for incredible homemade hummus requires three core pieces of equipment to achieve that dreamy, restaurant-style texture. We’ve chosen these tools to make the process as simple and foolproof as possible, ensuring your focus stays on creating the perfect creamy dip.
Your Essential Equipment Lineup:
❶ A High-Speed Blender: This is the non-negotiable hero for achieving a perfectly smooth, lump-free homemade hummus. Its powerful motor is key to creating the silky emulsion a food processor often misses. Pro Tip:For the best results, blend on low and gradually increase to the highest speed to ensure everything is perfectly incorporated.
❷ A Small Saucepan: Used to warm the chickpeas gently, this simple pan is the secret to softening them for that ultra-creamy texture. This one step dramatically reduces the blending time and effort required. Pro Tip:Warm the chickpeas in their canned liquid (aquafaba) to infuse more flavor and starch into your base.
❸ A Trusted Ceramic Bowl: Your versatile companion for everything from holding warmed chickpeas to whisking tahini. Its ability to retain heat helps keep the chickpeas warm during prep, aiding the overall blending process for your easy appetizer. Pro Tip:Slightly warm your ceramic bowl before adding the final hummus for serving; it makes the dip taste fresher and more luxurious.
Your Foolproof Roadmap to Perfect Hummus in 6 Simple Steps
Follow These Simple Steps for Perfect, Silky Smooth Hummus Every Time
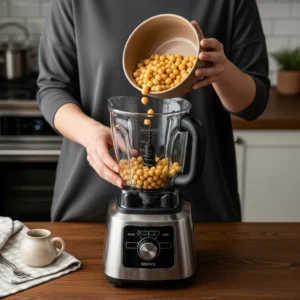
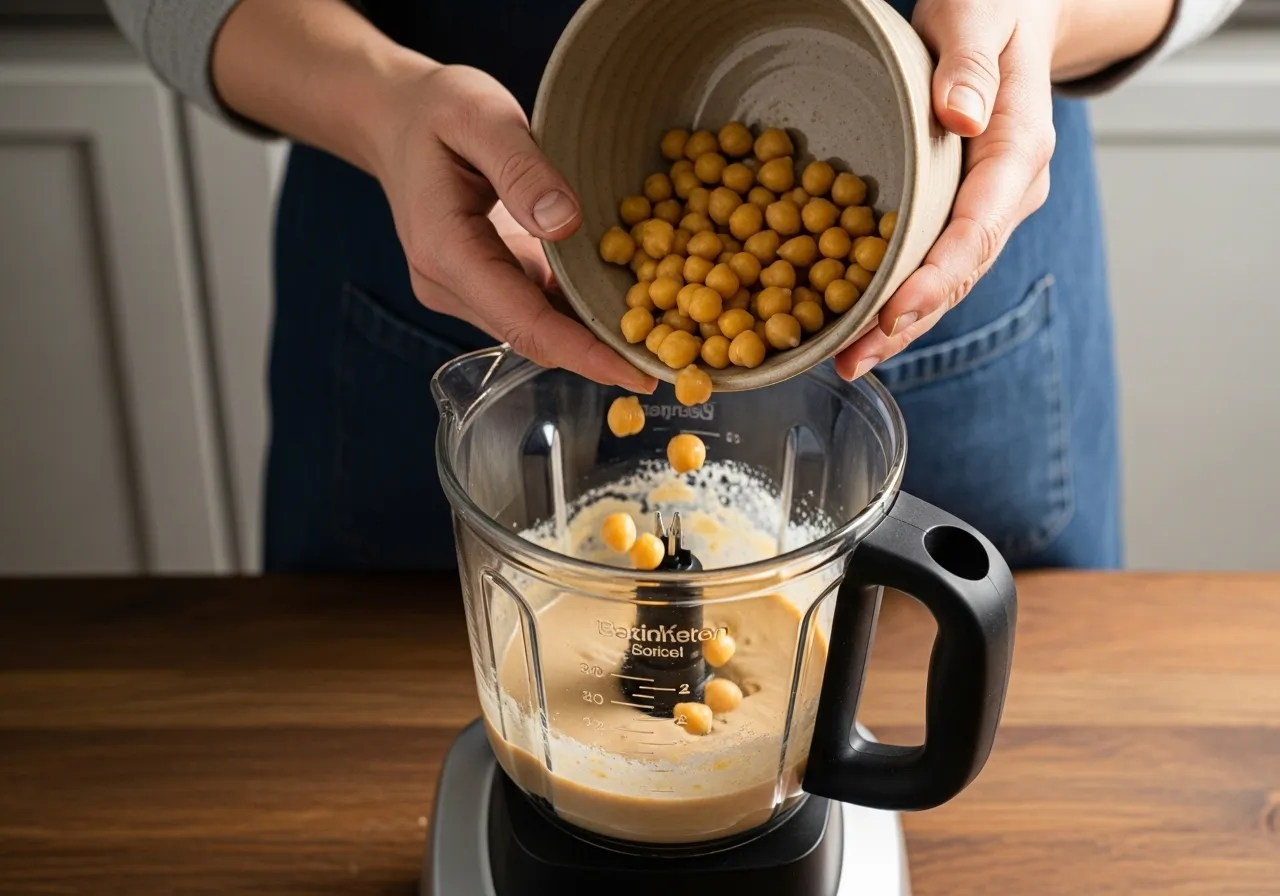
Step 1: Gently heat the chickpeas in their liquid to help create an incredibly smooth blend.
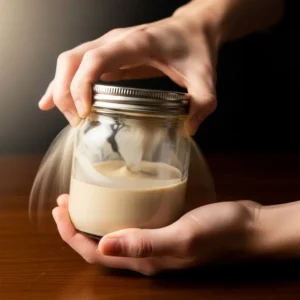
Step 2: Always shake your jar of tahini well to ensure a consistent, non-separated base for your hummus.
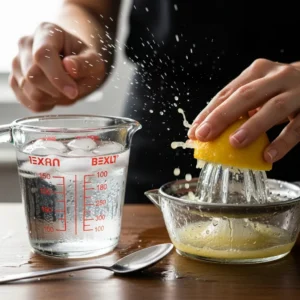
Step 3: Whip the tahini and fresh lemon juice together first to create a light, fluffy emulsion.
Step 4: Slowly drizzle ice-cold water into the blender while it’s running to create a light, creamy consistency.
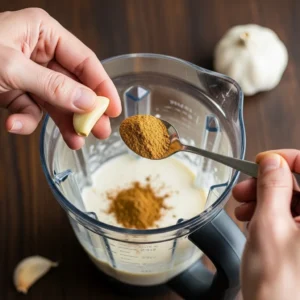
Step 5: Add the flavorings like fresh garlic and cumin to the creamy base before the final blend.
Step 6: Blend the hummus for a full four minutes until it is perfectly smooth and creamy.
Follow this precise, step-by-step guide to unlock the secret to the creamiest homemade hummus you’ve ever tasted. We’ve designed each step to build upon the last, ensuring a flawless creamy texture and transforming simple ingredients into an extraordinary, easy appetizer.
The 6-Step Culinary Journey:
Heat the Chickpeas: Gently warm them in their liquid on the stovetop. This crucial first step softens them, blending them into a perfectly smooth puree for your homemade hummus. Pro Tip:Don’t drain the liquid! Warming them in it (aquafaba) adds flavor and helps create a smoother consistency.
Shake Your Tahini: Vigorously shake the jar of tahini until it’s uniformly smooth and runny. A well-mixed tahini is the foundation of a non-bitter, emulsified creamy dip. Pro Tip:Store your tahini jar upside down to make remixing the oil and solids effortless.
Whip Tahini & Lemon: Blend the tahini and fresh lemon juice until it becomes a pale, thick, whipped cream. This aeration is the secret to a light, fluffy homemade hummus base. Pro Tip:Whip for a full 60 seconds. The mixture should look noticeably lighter in color and texture.
Drizzle in Ice Water: With the blender running, slowly stream the ice-cold water into the whipped tahini mixture. This shocking temperature change creates a stable, light, and airy emulsion for a silky dip. Pro Tip:Use ice water, not cold tap water, for the most dramatic whipping effect.
Add Garlic & Cumin: Incorporate the minced garlic and ground cumin into the creamy base. Blending them now ensures their flavors are fully integrated into every bite of your easy appetizer. Pro Tip:For a milder garlic flavor, use one small clove or lightly crush it and let it sit in the lemon juice for 5 minutes before blending.
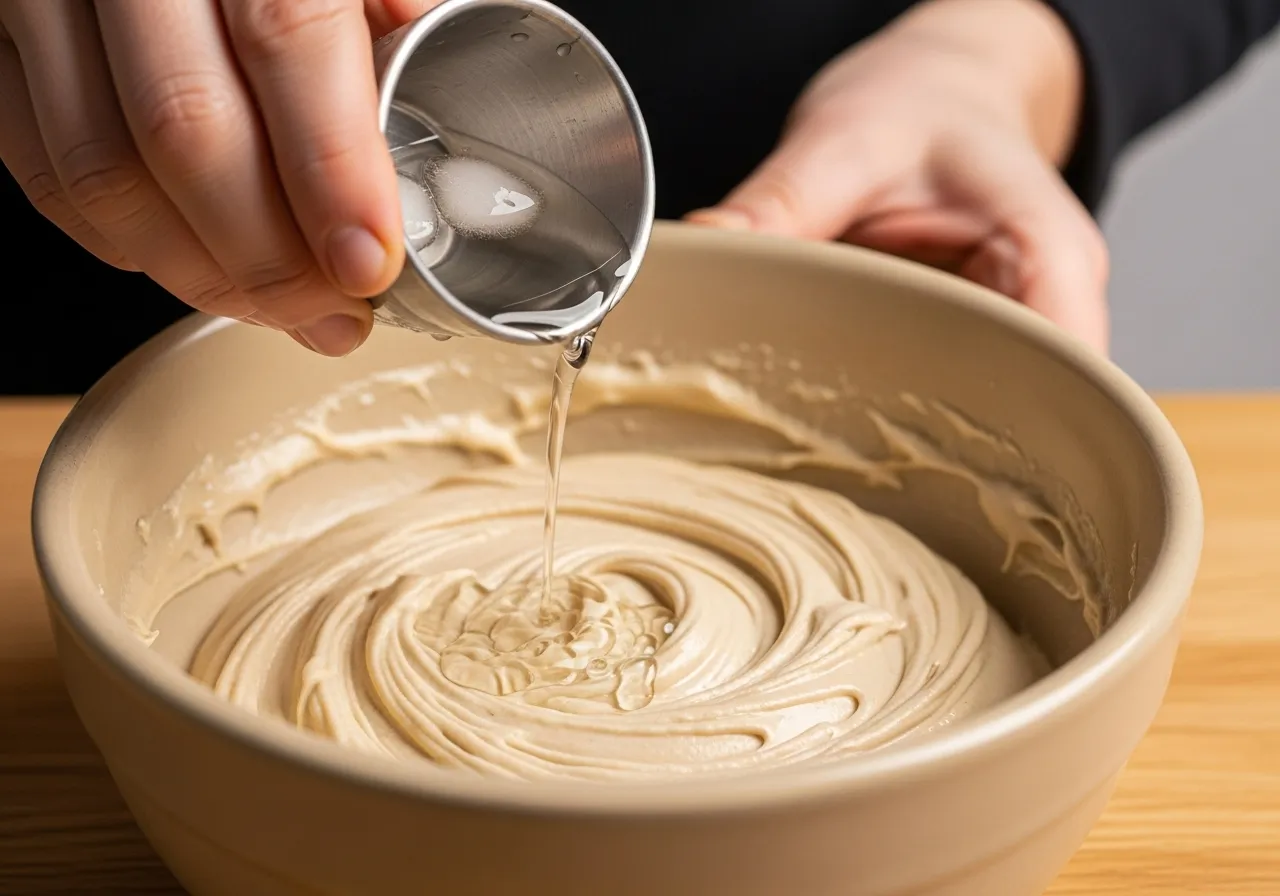
The Final Four-Minute Blend: Add the warm chickpeas and salt, then blend on high for four minutes without stopping. This patience is the final, non-negotiable key to a perfectly creamy texture with no grit. Pro Tip:Set a timer! Four minutes feels long, but it’s essential for transforming the mixture into a restaurant-quality dip.
Infographic Ingredients: Your At-a-Glance Guide
A Visual Guide to the Simple, Quality Ingredients You’ll Need
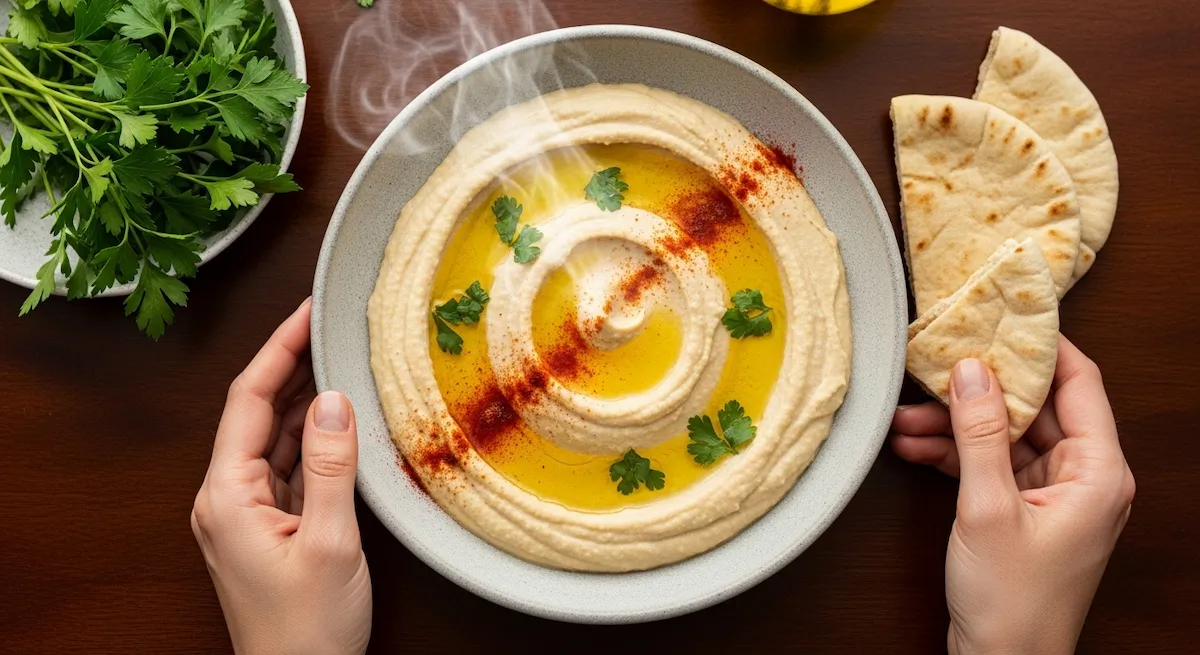
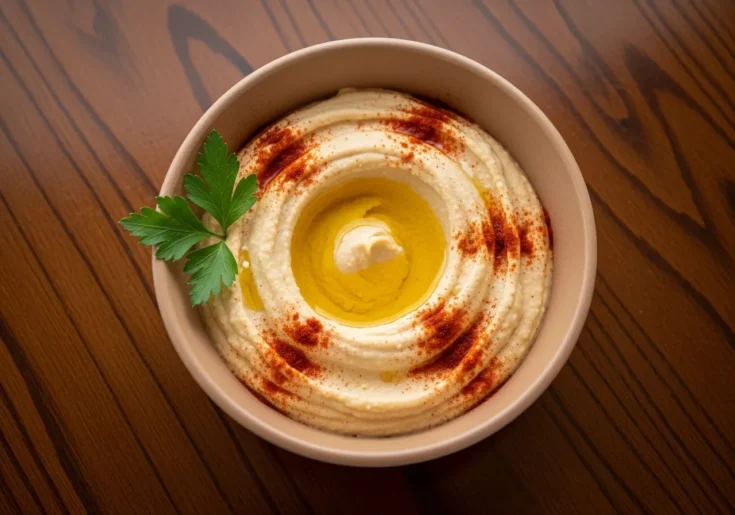
A visual guide to the simple, high-quality ingredients needed for the best creamy homemade hummus.
This visual guide breaks down the simple, high-quality components needed for our flawless homemade hummus. Keep this infographic handy to quickly gather your pantry staples and ensure you have everything for that dreamy, creamy texture.
The Building Blocks of Flawless Hummus:
➊ The Creamy Foundation: Canned chickpeas, high-quality tahini, and fresh lemon juice form the essential base of your homemade hummus.
➋ The Flavor Enhancers: Fresh garlic, ground cumin, and acceptable sea salt combine to create a deeply savory and balanced easy appetizer.
➌ The Perfect Finish: Extra-virgin olive oil, smoked paprika, and fresh parsley transform your dip into a visually stunning and delicious creamy dip.
Printable Recipe Card: Your Blueprint for Perfect Hummus
Your Printable Guide for Making Perfect Hummus Anytime
Homemade Hummus Recipe: 1 Trick for the Best Creamy Dip Ever
1. The Secret to Ultimate Creaminess:
Our unique warm-and-cold method guarantees the smoothest texture you've ever achieved at home.
Warm chickpeas and ice water create a magical emulsion for a smooth dip.
This foolproof technique eliminates the common problem of gritty or grainy hummus.
2. Simple, Quality Ingredients:
Just a handful of pantry staples transform into an extraordinary Middle Eastern dip.
High-quality tahini and fresh lemon juice are the non-negotiable flavor heroes.
No special tools or hard-to-find ingredients required for this authentic taste.
3. Your New Go-To Appetizer:
Perfect for quick snacks, elegant entertaining, or healthy lunchbox additions.
Ready in just 15 minutes from start to finish with minimal cleanup required.
A versatile base that you can customize with endless flavor variations.
Prep Time10 minutes
Cook Time5 minutes
Total Time15 minutes
Ingredients
1. For the Ultra-Smooth Base
1 can (15 oz) chickpeas, warmed
1/4 cup fresh ice water
1/2 cup high-quality tahini
1 small garlic clove
2. For Flavor & Brightness
3 tablespoons fresh lemon juice
3/4 teaspoon fine sea salt
1/4 teaspoon ground cumin
3. For Serving
1 tablespoon extra-virgin olive oil
1 teaspoon smoked paprika
2 tablespoons fresh chopped parsley
Instructions
1. The Key to Maximum Creaminess:
Heat the chickpeas in their liquid for 10 minutes.
Reserve the hot chickpea liquid for later.
Vigorously shake the tahini in its jar.
2. Building the Perfect Emulsion:
Blend the tahini and lemon juice until smooth and creamy.
Slowly drizzle in the ice water while blending.
Add the garlic and cumin to the creamy base.
3. The Final Smooth Blend:
Add the warm chickpeas and salt to the blender.
Blend for a full four minutes without stopping.
Drizzle with olive oil and paprika to serve.
Notes
1. For the Smoothest Texture:
Peel your chickpeas after warming for the absolute silkiest results.
Blend for the full four minutes without stopping for perfect creaminess.
Save 2 tablespoons of warm chickpea liquid to adjust consistency at the end.
2. Flavor Variations & Customization:
Add roasted red peppers or sun-dried tomatoes for a colorful twist.
Incorporate fresh herbs like cilantro or parsley for a vibrant flavor boost.
Adjust garlic and lemon levels to suit your personal taste preference.
3. Storage & Make-Ahead Tips:
Store in an airtight container in the refrigerator for up to 5 days.
Freeze portions for up to 3 months in freezer-safe containers.
Let hummus come to room temperature for 15 minutes before serving for the best flavour.
Nutrition Information
Yield
3
Serving Size
1/4 cup Amount Per ServingCalories 402Total Fat 28gSaturated Fat 4gUnsaturated Fat 22gSodium 754mgCarbohydrates 30gFiber 8gSugar 4gProtein 13g
Did you make this recipe?
Share your creation in the comments or on social media with pinterest
This condensed, easy-to-follow recipe card puts our entire method for flawless homemade hummus at your fingertips. Save it, print it, and keep it handy to whip up your new favorite creamy dip anytime the craving strikes.
Your Recipe Card Highlights:
★ Precise Measurements: Every ingredient is carefully measured to guarantee the perfect creamy texture for your homemade hummus.
★ Streamlined Instructions: Our unique warm-and-cold method is broken down into three clear, foolproof stages for an easy appetizer.
★ Expert Pro Tips:Built-in tips ensure you avoid common pitfalls and achieve a perfectly smooth, restaurant-style dip every time.
We hope you love creating this hummus as much as we do! If it becomes your new go-to recipe, we’d be thrilled if you could rate it with your stars in the card below—it helps us know what you enjoy most!
Infographic Instructions: Visualize Your Success
Our Step-by-Step Method in an Easy-to-Follow Visual Format
Follow these simple visual steps to make perfectly smooth and creamy homemade hummus every time.
Follow this streamlined, visual roadmap to create the smoothest homemade hummus of your life effortlessly. This infographic turns our unique method into an easy-to-follow ritual for a guaranteed perfect texture every single time.
The Path to Dip Perfection:
① Heat & Prepare: Warm the chickpeas and shake the tahini to set the stage for a silky dip.
② Create the Base: Whip the tahini with lemon juice, then emulsify with ice water for a light and fluffy foundation.
③ Blend to Perfection: Incorporate all ingredients and blend patiently to achieve the ultimate creamy texture for your homemade hummus.
You’ve Mastered the Secret! Now, Savor Your Creamy Triumph
You’ve Mastered the Art of the Perfect Creamy Dip – Here’s What’s Next!
You’ve just unlocked the simple, one-trick method to a homemade hummus that rivals any restaurant. This isn’t just another recipe; it’s your new standard for a quick, healthy, and impressively creamy dip that will make you a snack-time hero.
❖ Unbeatable Creamy Texture: The warm-and-cold technique guarantees a luxuriously smooth, never-gritty homemade hummus every single time.
❖ Effortless & Fast: From blender to bowl in minutes, this is the ultimate easy appetizer for busy days or unexpected guests.
❖ Incredibly Versatile Base: Master this classic; you have a foundation for endless flavorful variations.
The Joy of Sharing Your Culinary Win
❖ A Crowd-Pleasing Favorite: This is a guaranteed hit at gatherings, a healthy snack everyone can enjoy.
❖ Made with Wholesome Ingredients: You control what goes in, creating a nourishing homemade hummus you feel good about.
❖ A Skill for a Lifetime: You now possess the fundamental knowledge to make the perfect creamy dip forever.
Pro Tip: For the best flavor, let your hummus rest at room temperature for 15 minutes before serving.
🇺🇸 1. American Southwest Style
→ Tex-Mex Twist: Blend in 1 tsp chipotle powder + ¼ cup roasted corn
→ Crowd Pleaser: Top with black beans, cilantro, and lime wedge
→ Serving Idea: Perfect for game day parties and casual gatherings
🇬🇧 2. British Pub Style
→ Hearty Addition: Mix in 2 tbsp HP sauce + ¼ cup finely chopped pickled onions
→ Savory Upgrade: Serve with thick-cut chips and ale-battered vegetables
→ Pub Experience: Creates a robust, tangy homemade hummus variation
🇨🇦 3. Canadian Maple Bacon
→ Sweet & Savory: Add 1 tbsp maple syrup + ¼ cup crumbled cooked bacon
→ Breakfast Hummus: Serve with apple slices and whole-grain crackers
→ Unique Fusion: Balances smoky, sweet, and savory flavors perfectly
🇦🇺 4. Australian Bush Tucker
→ Native Flavors: Mix in 1 tsp lemon myrtle + 1 tbsp macadamia pieces
→ Earthy Twist: Garnish with toasted wattleseed and fresh finger lime
→ Outdoor Dining: Perfect for barbecues and outdoor entertaining
🇩🇪 5. German Beer Garden Style
→ Bavarian Touch: Replace 2 tbsp water with dark beer + add caraway seeds
→ Hearty Appeal: Serve with pretzels, rye bread, and mustard on the side
→ Oktoberfest Ready: Creates a malty, aromatic homemade hummus experience
🇫🇷 6. French Provençal Elegance
→ Herbes de Provence: Blend in 2 tsp herb mix + 1 tbsp black olive tapenade
→ Sophisticated Touch: Garnish with edible flowers and lavender sprigs
→ Wine Pairing: Perfect with rosé wine and baguette slices
Pro Tip: When creating international homemade hummus variations, start with small amounts of new ingredients and adjust to taste. This ensures you maintain the perfect creamy base while exploring global flavors from high-CPM countries!
FAQs: Your Homemade Hummus Questions Answered!
Q1. Why is my homemade hummus always grainy and not smooth?
Grainy hummus breaks our hearts, too! Here are the most common culprits and their simple fixes:
Cold Chickpeas: Always warm them first to soften their structure for blending.
Short Blending Time: Patience is key – blend for 4 minutes without stopping.
Unpeeled Chickpeas: Remove the skins for the absolute smoothest texture possible.
Weak Blender: Use a high-powered blender for the creamiest homemade hummus.
Pro Tip: Add 1-2 tablespoons of the warm chickpea liquid (aquafaba) during blending. This natural starch works miracles for creating silky, smooth homemade hummus.
Q2. Can I make this homemade hummus without a high-speed blender?
While a blender creates the creamiest texture, you can still achieve delicious results with these alternatives:
Food Processor: Process for 6-8 minutes, scraping down sides frequently.
Immersion Blender: Use a deep, narrow container and blend in circular motions.
Mortar and Pestle: A traditional method that creates incredibly smooth hummus with effort.
Potato Ricer: Press warm chickpeas first, then mix with other ingredients.
Pro Tip: If using a food processor, soak your warmed chickpeas in ice water for 10 minutes first—this will puff them up for easier pureeing in your homemade hummus.
Q3. My hummus tastes bitter – what went wrong and how can I fix it?
Bitterness usually comes from one source, but has several delicious solutions:
Tahini Quality: Always taste your tahini first – it should be nutty, not bitter.
Garlic Overload: Use just 1 small clove, or roast it first for a milder flavor.
Lemon Balance: Add more lemon juice gradually until the bitterness disappears.
Olive Oil Type: Some extra virgin olive oils can be naturally bitter.
Pro Tip: Add a pinch of sugar or maple syrup to balance bitterness—start with ¼ teaspoon and taste as you go for the perfect creamy dip.
Q4. How long does homemade hummus last in the refrigerator?
Your fresh hummus has a beautiful lifespan when appropriately stored:
Peak Freshness: 3-4 days for the best flavor and texture.
Still Safe: Up to 7 days when stored in an airtight container.
Visual Check: Discard if you see mold or detect sour smells.
Texture Change: It may thicken over time – stir in a little water to refresh.
Pro Tip: Pour a thin layer of olive oil over the surface before sealing. This creates a protective barrier that keeps your homemade hummus fresher longer.
Q5. Can I freeze homemade hummus successfully?
Yes! Freezing is a fantastic way to preserve your creamy dip with these simple steps:
Portion Control: Freeze in individual containers for easy thawing.
Leave Headspace: Expansion happens – leave ½ inch at the top.
Freezer Duration: Maintains quality for up to 4 months.
Thawing Method: Transfer to refrigerator 12 hours before serving.
Pro Tip: Stir vigorously after thawing to re-emulsify – the texture of your homemade hummus will be nearly identical to fresh!
Q6. What’s the secret to making hummus creamy without adding tons of oil?
Create luxurious texture without oil overload using these clever techniques:
Ice Water Magic: The temperature shock creates an excellent emulsion.
Aquafaba Power: Use the chickpea liquid for natural creaminess.
Extended Blending: Time and friction create smoothness naturally.
Tahini Quality: Good tahini provides natural oils and creaminess.
Pro Tip: Add 2-3 ice cubes instead of water during blending —the gradual melt creates the most incredible creamy texture in your homemade hummus.
Q7. My hummus is too thick – how can I thin it out properly?
Rescuing thick hummus is easy with these simple liquid additions:
Warm Water: Add 1 tablespoon at a time while blending.
Aquafaba: Use the reserved chickpea liquid for enhanced flavor.
Lemon Juice: Brightens flavor while thinning consistency.
Yogurt: Adds tang and creaminess while thinning.
Pro Tip: Always thin your hummus while it’s still in the blender. This ensures perfect incorporation and saves you from washing extra bowls for your easy appetizer.
Q8. Can I use dried chickpeas instead of canned for homemade hummus?
Absolutely! Dried chickpeas create the most incredible texture with these steps:
Overnight Soak: Cover with 3 inches of water for 8-12 hours.
Quick Soak Method: Boil for 2 minutes, then steep for 1 hour.
Cooking Time: Simmer 60-90 minutes until very tender.
Baking Soda Trick: Add ¼ teaspoon to cooking water for extra-soft chickpeas.
Pro Tip: Cook dried chickpeas with a strip of kombu seaweed – it makes them more digestible and adds minerals to your healthy snack.


")
")

")
")